Multi-vendor EVPN VXLAN setup with Containerlab
In this post, we deploy a multivendor EVPN L2 overlay fabric, with BGP in the underlay as well. The entire fabric deployment is automated with Ansible, and Containerlab is used to define and deploy the actual topology.
Introduction and topology
This post continues to build and showcase the power of containerlab. In this post, we will create a multivendor EVPN topology for L2 overlays. The vendors included are Arista (vEOS), Juniper (vQFX), Cumulus (Cumulus VX) and Cisco (N9Kv). Every piece of software used here is free (some might be behind a login, so you’ll have to register to get access to image downloads).
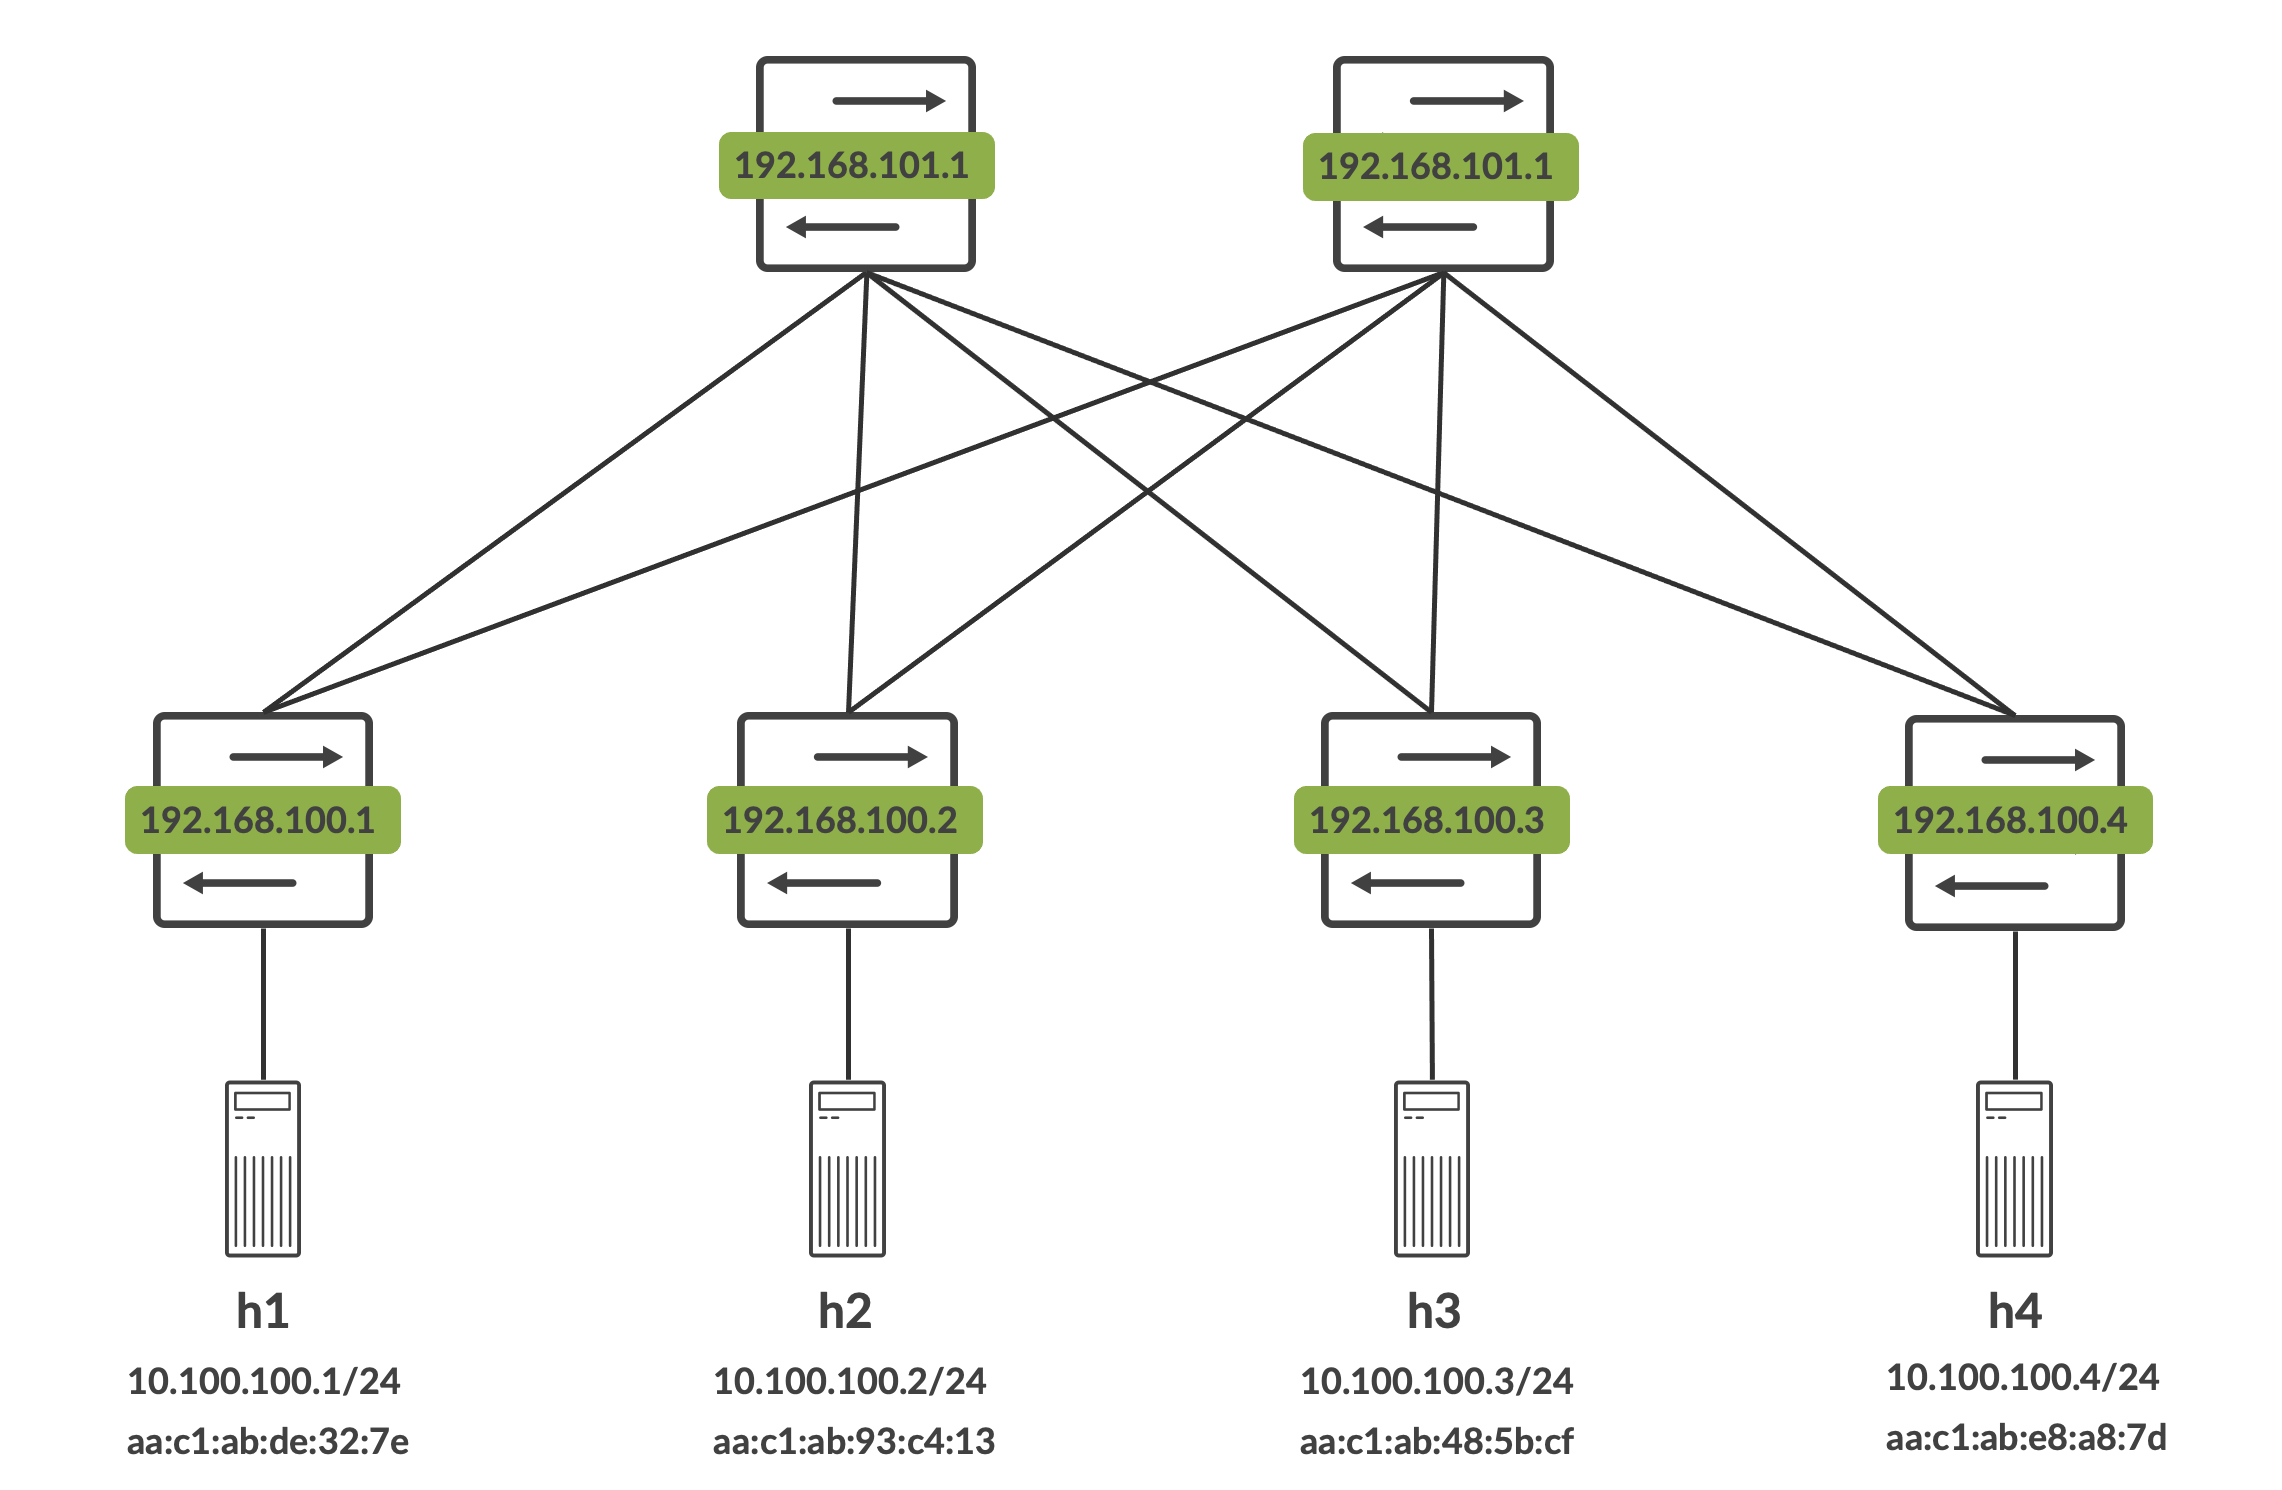
The topology is as follows:
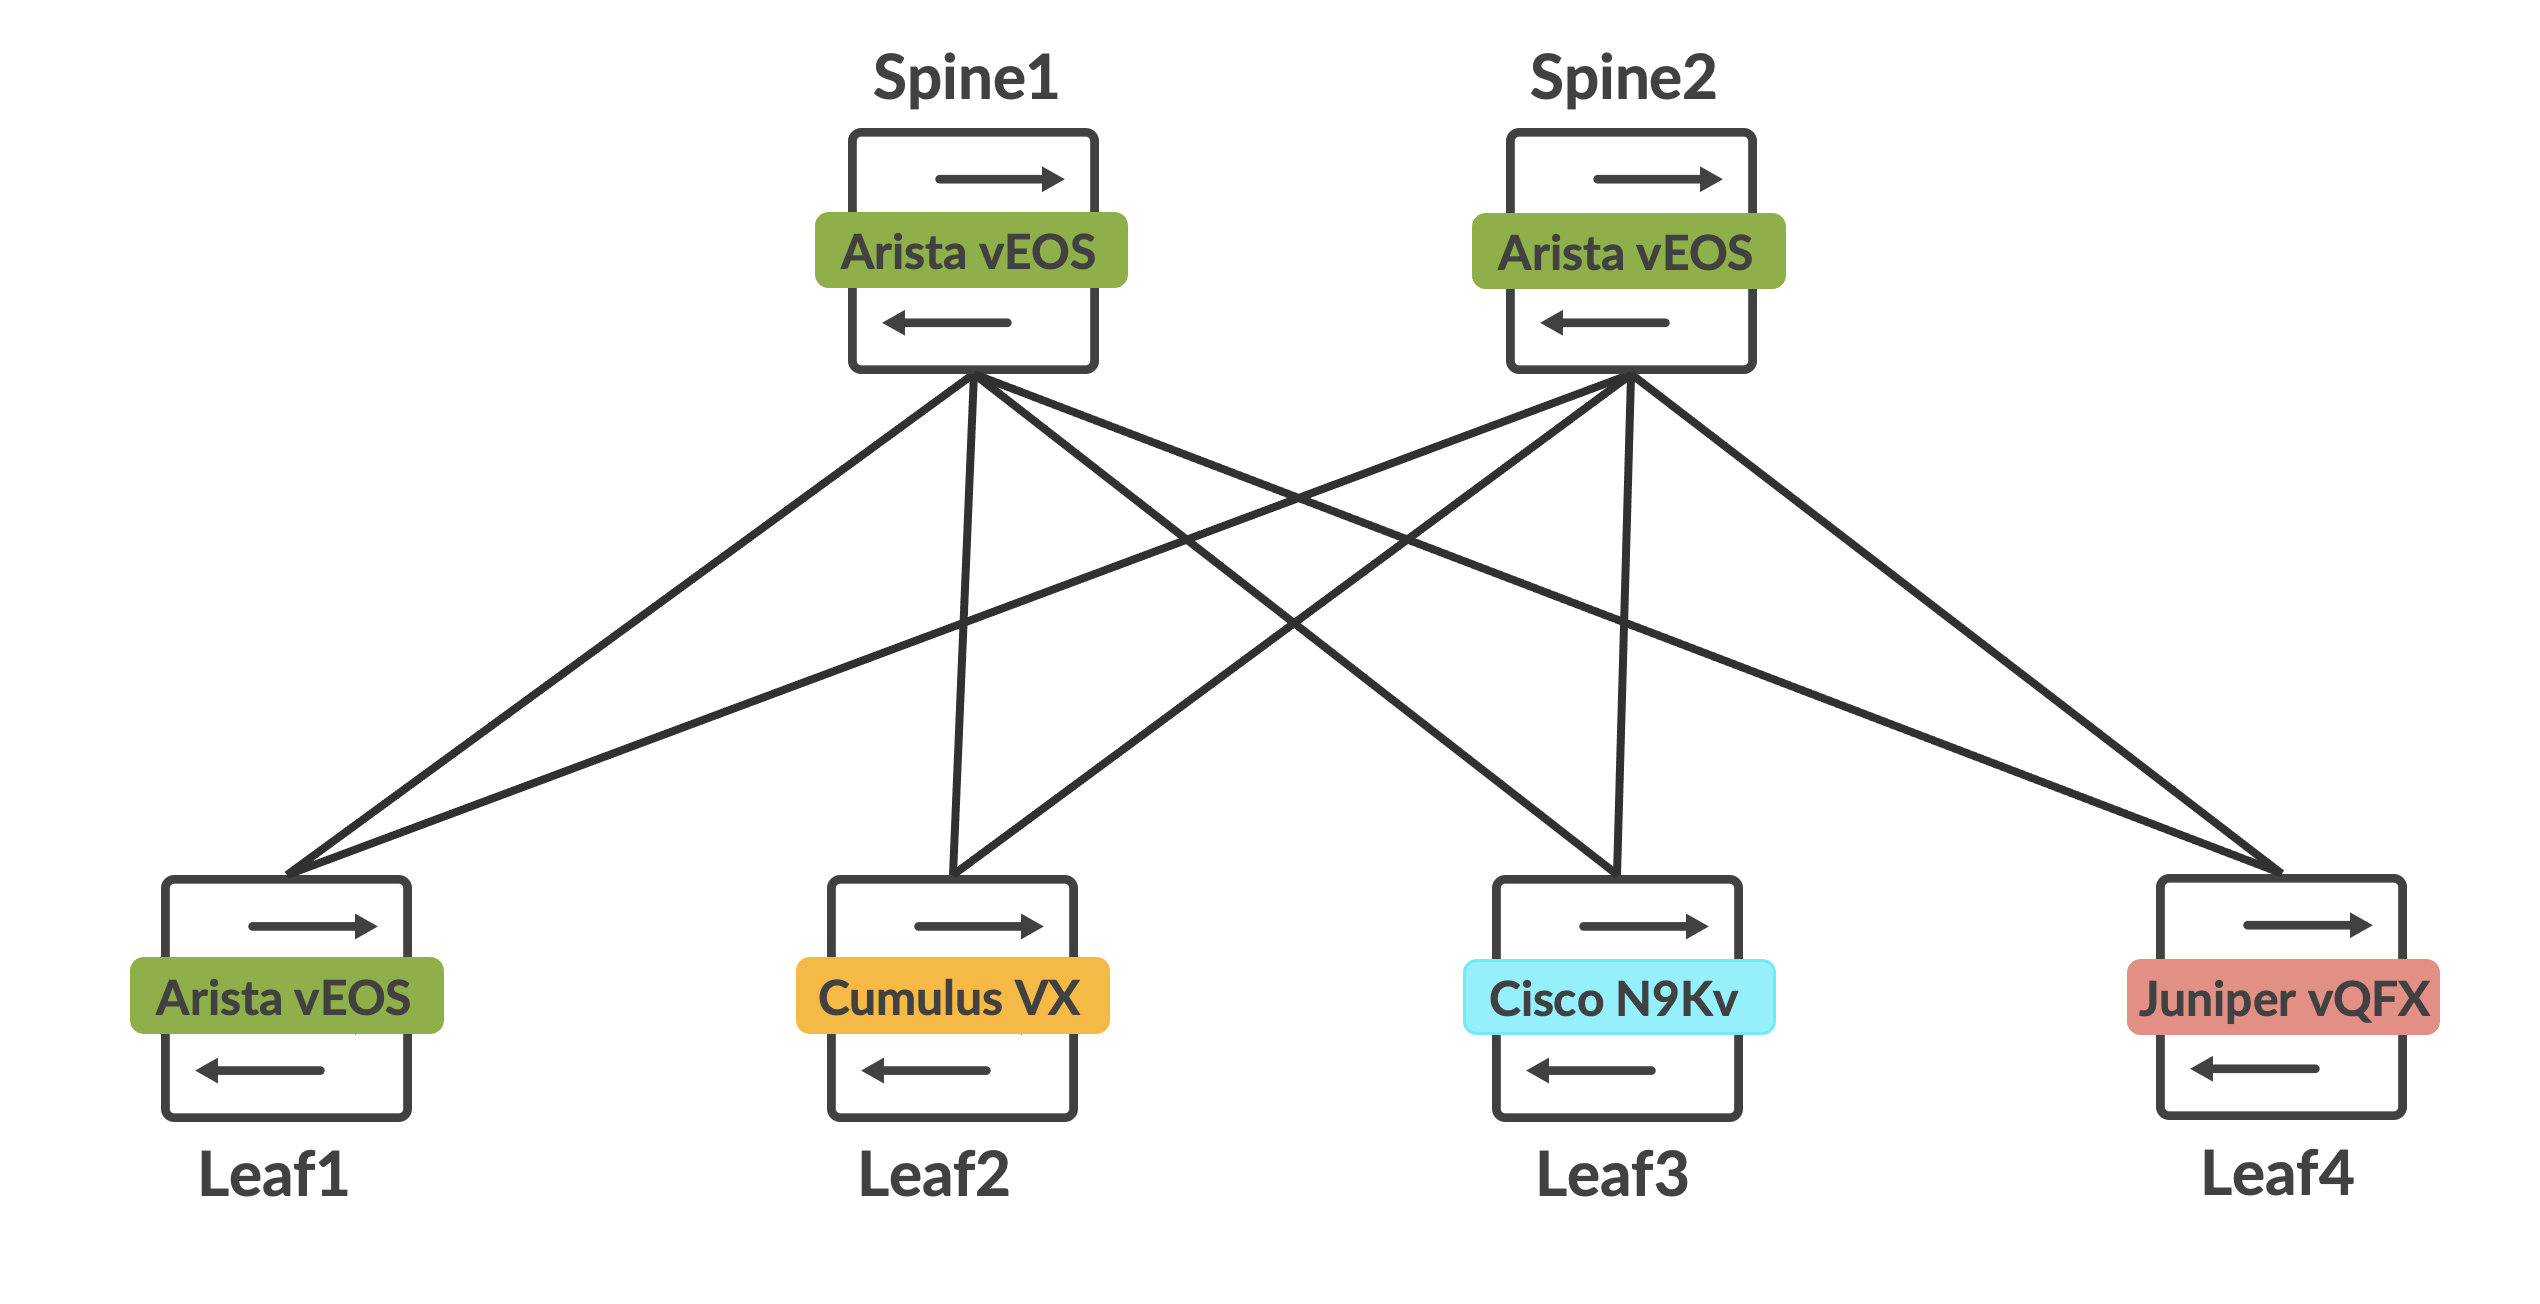
Arista vEOS is used for both the spines and leaf1. Cumulus VX is leaf2, Cisco N9Kv is leaf3 and Juniper vQFX is leaf4. Behind each leaf is a host, and all hosts are in the same 10.100.100.0/24 subnet. Router-IDs for each spine and leaf, along with the host details are as follows. The router-ID with a /32 mask makes up the loopback of each device as well:
The endgoal is to get all the hosts to talk to each other, and also understand if these vendors play nice with each other when deploying L2 overlays with BGP EVPN and VXLAN (we’re in for a few interesting surprises here).
Building the docker images
Juniper vQFX
Juniper vQFX can be built using their qcow2 images that are available publicly. I’ve already written about this in an earlier blog post with complete instructions on how this is built and what is happening behind the scenes.
Cumulus VX
Docker images are not officially maintained for this by Cumulus Networks (now Nvidia). However, Michael (@networkop) maintains some unofficial images here. You can simply pull this using ‘docker pull’.
root@aninchat-ubuntu:~/clabs# docker pull networkop/cx:4.4.0
4.4.0: Pulling from networkop/cx
bd8f6a7501cc: Pull complete
cd45a4bb2831: Pull complete
3267eb82436d: Pull complete
43c69aa0f07d: Pull complete
5467689b757b: Pull complete
47813b34fad7: Pull complete
dffd6a1e6cf7: Pull complete
c5ff024177cd: Pull complete
8fbd9fcb1a0b: Pull complete
b24d53edac2f: Pull complete
a287a0d978c0: Pull complete
050552fdbe9c: Pull complete
12c6d13747e2: Pull complete
7a90f1a90542: Pull complete
d4e73cf57d80: Pull complete
e90926507c70: Pull complete
2476c9c7d51c: Pull complete
28e6b7764b01: Pull complete
81c55abe901f: Pull complete
9072c910401f: Pull complete
f4e46c63c0c6: Pull complete
4347adc92cde: Pull complete
1e2015807ed1: Pull complete
bb63128af12d: Pull complete
ff47aad4ed38: Pull complete
8956d77e1873: Pull complete
41a3ceebbb60: Pull complete
440c42b04957: Pull complete
bb3ae1d72db8: Pull complete
085ab76472c5: Pull complete
e851254ed5e5: Pull complete
6122afe252b1: Pull complete
2156d27e047f: Pull complete
d1b2f513878e: Pull complete
836eb1aec088: Pull complete
5aa925411d8b: Pull complete
Digest: sha256:2ef73abf91c2214ceec08df00580c8754d7a4163391841fe2ad714596a361a4a
Status: Downloaded newer image for networkop/cx:4.4.0
docker.io/networkop/cx:4.4.0
You should now see this image available for use:
root@aninchat-ubuntu:~/clabs# docker images | grep cx
networkop/cx         5.0.1       4d6152fa636b   2 weeks ago     805MB
networkop/cx         4.4.0       468cdd1a4be5   7 months ago    772MB
He maintains a fairly up-to-date list of corresponding docker images, but I’ve pulled an older one because I am not too fond of the new NVUE interface that Cumulus Linux has shifted to - I prefer the older NCLU, which 4.4.x still runs.
Arista vEOS
Arista vEOS can be downloaded for free from Arista’s software download site. This is locked behind a guest registration though, so you still need to go through that entire process if you’d like to download this. Once you have the vEOS image (it should be a vmdk file), place it in the vrnet/veos folder.
root@aninchat-ubuntu:~/vrnetlab/veos# pwd
/root/vrnetlab/veos
root@aninchat-ubuntu:~/vrnetlab/veos# ls -l
total 491984
-rw-r--r-- 1 root root      1028 Feb  5 15:41 Makefile
-rw-r--r-- 1 root root      1281 Feb  5 15:41 README.md
drwxr-xr-x 2 root root      4096 Feb 16 06:35 docker
-rw-r--r-- 1 root root 503775232 Feb 16 06:35 vEOS-lab-4.27.2F.vmdk
You can now trigger the docker image build using ‘make’. Since I already have the image built, it doesn’t do much for me at this point.
root@aninchat-ubuntu:~/vrnetlab/veos# make
Makefile:18: warning: overriding recipe for target 'docker-pre-build'
../makefile.include:18: warning: ignoring old recipe for target 'docker-pre-build'
for IMAGE in vEOS-lab-4.27.2F.vmdk; do \
	echo "Making $IMAGE"; \
	make IMAGE=$IMAGE docker-build; \
done
Making vEOS-lab-4.27.2F.vmdk
make[1]: Entering directory '/root/vrnetlab/veos'
Makefile:18: warning: overriding recipe for target 'docker-pre-build'
../makefile.include:18: warning: ignoring old recipe for target 'docker-pre-build'
rm -f docker/*.qcow2* docker/*.tgz* docker/*.vmdk* docker/*.iso
# checking if ZTP config contains a string (DISABLE=True) in the file /zerotouch-config
# if it does, we don't need to write this file
Checking ZTP status
ZTPOFF=DISABLE=True; \
echo "docker-pre-build: ZTPOFF is $ZTPOFF" && \
    if [ "$ZTPOFF" != "DISABLE=True" ]; then \
      echo "Disabling ZTP" && docker run --rm -it -e LIBGUESTFS_DEBUG=0 -v $(pwd):/work cmattoon/guestfish -a vEOS-lab-4.27.2F.vmdk -m /dev/sda2 write /zerotouch-config "DISABLE=True"; \
    fi
docker-pre-build: ZTPOFF is DISABLE=True
Building docker image using vEOS-lab-4.27.2F.vmdk as vrnetlab/vr-veos:4.27.2F
cp ../common/* docker/
make IMAGE=$IMAGE docker-build-image-copy
make[2]: Entering directory '/root/vrnetlab/veos'
Makefile:18: warning: overriding recipe for target 'docker-pre-build'
../makefile.include:18: warning: ignoring old recipe for target 'docker-pre-build'
cp vEOS-lab-4.27.2F.vmdk* docker/
make[2]: Leaving directory '/root/vrnetlab/veos'
(cd docker; docker build --build-arg http_proxy= --build-arg https_proxy= --build-arg IMAGE=vEOS-lab-4.27.2F.vmdk -t vrnetlab/vr-veos:4.27.2F .)
Sending build context to Docker daemon  503.8MB
Step 1/11 : FROM ubuntu:20.04
 ---> 54c9d81cbb44
Step 2/11 : LABEL maintainer="Kristian Larsson <kristian@spritelink.net>"
 ---> Using cache
 ---> b8a0857a144e
Step 3/11 : LABEL maintainer="Roman Dodin <dodin.roman@gmail.com>"
 ---> Using cache
 ---> a22af11cc083
Step 4/11 : ARG DEBIAN_FRONTEND=noninteractive
 ---> Using cache
 ---> 1735e5bccc44
Step 5/11 : RUN apt-get update -qy  && apt-get upgrade -qy  && apt-get install -y     bridge-utils     iproute2     python3-ipy     socat     qemu-kvm     tcpdump     tftpd-hpa     ssh     inetutils-ping     dnsutils     openvswitch-switch     iptables     telnet  && rm -rf /var/lib/apt/lists/*
 ---> Using cache
 ---> 43deb024677e
Step 6/11 : ARG IMAGE
 ---> Using cache
 ---> 36e30f700548
Step 7/11 : COPY $IMAGE* /
 ---> Using cache
 ---> 858ae07ca107
Step 8/11 : COPY *.py /
 ---> Using cache
 ---> 62058063f86c
Step 9/11 : EXPOSE 22 80 161/udp 443 830 5000 6030 10000-10099 57400
 ---> Using cache
 ---> 53c2102098d6
Step 10/11 : HEALTHCHECK CMD ["/healthcheck.py"]
 ---> Using cache
 ---> 9b3ebcc4ab71
Step 11/11 : ENTRYPOINT ["/launch.py"]
 ---> Using cache
 ---> 11aed84d6be0
Successfully built 11aed84d6be0
Successfully tagged vrnetlab/vr-veos:4.27.2F
make[1]: Leaving directory '/root/vrnetlab/veos'
You should now see this image available to use:
root@aninchat-ubuntu:~/vrnetlab/n9kv# docker images | grep veos
vrnetlab/vr-veos     4.27.2F     11aed84d6be0   2 weeks ago     932MB
Cisco N9Kv
Cisco’s N9Kv is also available for free (again, locked behind an account registration). Similar to the earlier processes, download the qcow2 image and move it to the vrnetlab/n9kv folder.
root@aninchat-ubuntu:~/vrnetlab/n9kv# pwd
/root/vrnetlab/n9kv
root@aninchat-ubuntu:~/vrnetlab/n9kv# ls -l
total 1934160
-rw-r--r-- 1 root root        266 Feb  5 15:41 Makefile
-rw-r--r-- 1 root root        585 Feb  5 15:41 README.md
drwxr-xr-x 2 root root       4096 Feb 16 15:54 docker
-rw-r--r-- 1 root root 1980563456 Feb 16 06:51 nxosv.9.3.9.qcow2
Be sure to use the ‘n9kv’ folder and not the ‘nxos’ folder - the ‘nxos’ folder is for the older titanium images. Once the image is copied here, trigger ‘make’ to build the docker image for this.
root@aninchat-ubuntu:~/vrnetlab/n9kv# make
for IMAGE in nxosv.9.3.9.qcow2; do \
	echo "Making $IMAGE"; \
	make IMAGE=$IMAGE docker-build; \
done
Making nxosv.9.3.9.qcow2
make[1]: Entering directory '/root/vrnetlab/n9kv'
rm -f docker/*.qcow2* docker/*.tgz* docker/*.vmdk* docker/*.iso
Building docker image using nxosv.9.3.9.qcow2 as vrnetlab/vr-n9kv:9.3.9
cp ../common/* docker/
make IMAGE=$IMAGE docker-build-image-copy
make[2]: Entering directory '/root/vrnetlab/n9kv'
cp nxosv.9.3.9.qcow2* docker/
make[2]: Leaving directory '/root/vrnetlab/n9kv'
(cd docker; docker build --build-arg http_proxy= --build-arg https_proxy= --build-arg IMAGE=nxosv.9.3.9.qcow2 -t vrnetlab/vr-n9kv:9.3.9 .)
Sending build context to Docker daemon  1.985GB
Step 1/12 : FROM ubuntu:20.04
 ---> 54c9d81cbb44
Step 2/12 : LABEL maintainer="Kristian Larsson <kristian@spritelink.net>"
 ---> Using cache
 ---> b8a0857a144e
Step 3/12 : LABEL maintainer="Roman Dodin <dodin.roman@gmail.com>"
 ---> Using cache
 ---> a22af11cc083
Step 4/12 : ARG DEBIAN_FRONTEND=noninteractive
 ---> Using cache
 ---> 1735e5bccc44
Step 5/12 : RUN apt-get update -qy  && apt-get upgrade -qy  && apt-get install -y     bridge-utils     iproute2     python3-ipy     socat     qemu-kvm     tcpdump     tftpd-hpa     ssh     inetutils-ping     dnsutils     openvswitch-switch     iptables     telnet  && rm -rf /var/lib/apt/lists/*
 ---> Using cache
 ---> 43deb024677e
Step 6/12 : ARG IMAGE
 ---> Using cache
 ---> 36e30f700548
Step 7/12 : COPY $IMAGE* /
 ---> Using cache
 ---> 66fbaa5d2045
Step 8/12 : COPY OVMF.fd /
 ---> Using cache
 ---> 87c96b2ebf08
Step 9/12 : COPY *.py /
 ---> Using cache
 ---> 756902fd2036
Step 10/12 : EXPOSE 22 80 161/udp 443 830 5000 6030 10000-10099 57400
 ---> Using cache
 ---> df3be4a02195
Step 11/12 : HEALTHCHECK CMD ["/healthcheck.py"]
 ---> Using cache
 ---> 5143e36e8998
Step 12/12 : ENTRYPOINT ["/launch.py"]
 ---> Using cache
 ---> 0eb634fdcd16
Successfully built 0eb634fdcd16
Successfully tagged vrnetlab/vr-n9kv:9.3.9
make[1]: Leaving directory '/root/vrnetlab/n9kv'
You should now see this image available to use:
root@aninchat-ubuntu:~/vrnetlab/n9kv# docker images | grep n9k
vrnetlab/vr-n9kv     9.3.9       0eb634fdcd16   2 weeks ago     2.41GB
End hosts
For hosts, I like to use Michael’s host docker image (networkop/host) which are based on Ubuntu 20.04. You can pull the latest tag (‘ifreload’) from dockerhub.
root@aninchat-ubuntu:~# docker pull networkop/host:ifreload
ifreload: Pulling from networkop/host
f7ec5a41d630: Pull complete
dcf92054a263: Pull complete
3179c3d1124f: Pull complete
eea897900801: Pull complete
717337aab6d8: Pull complete
23ffec7efd97: Pull complete
6bdc05c9f934: Pull complete
Digest: sha256:ed38567dc55f88cda67a208eae36f6a6569b461c767f7be6db04298ae89f3fc5
Status: Downloaded newer image for networkop/host:ifreload
docker.io/networkop/host:ifreload
This image should now be available to use:
root@aninchat-ubuntu:~# docker images | grep host
networkop/host       ifreload    b73cafd09ad8   7 months ago    283MB
We have all our vendor images built and ready to go now.
The Containerlab topology
The topology file
The following topology file describes the nodes and the interconnections between them for containerlab:
root@aninchat-ubuntu:~/clabs/multivendor# cat evpn-multivendor.yml
name: evpn-l2-multivendor
topology:
  nodes:
    spine1:
            kind: vr-veos
            image: vrnetlab/vr-veos:4.27.2F
            mgmt_ipv4: 172.20.20.101
    spine2:
            kind: vr-veos
            image: vrnetlab/vr-veos:4.27.2F
            mgmt_ipv4: 172.20.20.102
    leaf1:
            kind: vr-veos
            image: vrnetlab/vr-veos:4.27.2F
            mgmt_ipv4: 172.20.20.11
    leaf2:
            kind: cvx
            image: networkop/cx:4.4.0
    leaf3:
            kind: vr-n9kv
            image: vrnetlab/vr-n9kv:9.3.9
            mgmt_ipv4: 172.20.20.13
    leaf4:
            kind: vr-vqfx
            image: vrnetlab/vr-vqfx:20.2R1.10
            mgmt_ipv4: 172.20.20.14
    h1:
            kind: linux
            image: networkop/host:ifreload
            binds:
                    - hosts/h1_interfaces:/etc/network/interfaces
            mgmt_ipv4: 172.20.20.21
    h2:
            kind: linux
            image: networkop/host:ifreload
            binds:
                    - hosts/h2_interfaces:/etc/network/interfaces
            mgmt_ipv4: 172.20.20.22
    h3:
            kind: linux
            image: networkop/host:ifreload
            binds:
                    - hosts/h3_interfaces:/etc/network/interfaces
            mgmt_ipv4: 172.20.20.23
    h4:
            kind: linux
            image: networkop/host:ifreload
            binds:
                    - hosts/h4_interfaces:/etc/network/interfaces
            mgmt_ipv4: 172.20.20.24
  links:
          - endpoints: ["leaf1:eth1", "spine1:eth1"]
          - endpoints: ["leaf1:eth2", "spine2:eth1"]
          - endpoints: ["leaf2:swp1", "spine1:eth2"]
          - endpoints: ["leaf2:swp2", "spine2:eth2"]
          - endpoints: ["leaf3:eth1", "spine1:eth3"]
          - endpoints: ["leaf3:eth2", "spine2:eth3"]
          - endpoints: ["leaf4:eth1", "spine1:eth4"]
          - endpoints: ["leaf4:eth2", "spine2:eth4"]
          - endpoints: ["leaf1:eth3", "h1:eth1"]
          - endpoints: ["leaf2:swp3", "h2:eth1"]
          - endpoints: ["leaf3:eth3", "h3:eth1"]
          - endpoints: ["leaf4:eth3", "h4:eth1"]
Using ‘binds’ in the topology file
Note that the ‘binds’ block allows us to bind a file in the host OS to the container itself. In this case, I am simply pre-configuring the network interfaces for the fabric hosts by copying relevant configuration into the /etc/network/interfaces file of the container.
For example, let’s take host h1 and it’s file, hosts/h1_interfaces:
root@aninchat-ubuntu:~/clabs/multivendor# cat hosts/h1_interfaces
auto lo
iface lo inet loopback

auto eth1
iface eth1 inet static
    address 10.100.100.1
    netmask 255.255.255.0
All my hosts are in the same subnet, so h2 is 10.100.100.2/24, h3 is 10.100.100.3/24 and h4 is 10.100.100.4/24.
Deploying the lab
We can now deploy this lab using ‘containerlab deploy’:
root@aninchat-ubuntu:~/clabs/multivendor# containerlab deploy --topo evpn-multivendor.yml
INFO[0000] Containerlab v0.23.0 started
INFO[0000] Parsing & checking topology file: evpn-multivendor.yml
INFO[0000] Creating lab directory: /root/clabs/multivendor/clab-evpn-l2-multivendor
INFO[0000] Creating docker network: Name='clab', IPv4Subnet='172.20.20.0/24', IPv6Subnet='2001:172:20:20::/64', MTU='1500'
INFO[0000] Creating container: h4
INFO[0000] Creating container: h3
INFO[0000] Creating container: spine2
INFO[0000] Creating container: leaf1
INFO[0000] Creating container: leaf3
INFO[0000] Creating container: leaf4
INFO[0000] Creating container: h1
INFO[0000] Creating container: h2
INFO[0000] Creating container: spine1
INFO[0001] Creating virtual wire: leaf1:eth3 <--> h1:eth1
INFO[0001] Creating virtual wire: leaf4:eth3 <--> h4:eth1
INFO[0001] Creating virtual wire: leaf4:eth2 <--> spine2:eth4
INFO[0001] Creating virtual wire: leaf1:eth2 <--> spine2:eth1
INFO[0002] Creating virtual wire: leaf1:eth1 <--> spine1:eth1
INFO[0002] Creating virtual wire: leaf4:eth1 <--> spine1:eth4
INFO[0002] Creating virtual wire: leaf3:eth1 <--> spine1:eth3
INFO[0002] Creating virtual wire: leaf3:eth2 <--> spine2:eth3
INFO[0002] Creating virtual wire: leaf3:eth3 <--> h3:eth1
INFO[0002] Networking is handled by "docker-bridge"
INFO[0002] Started Firecracker VM "b01b941136a18c36" in a container with ID "86191b18f7f9fd90011aa9627ee972c882beb0d2fdb43a98e45347ccd2ca4014"
INFO[0002] Creating virtual wire: leaf2:swp1 <--> spine1:eth2
INFO[0002] Creating virtual wire: leaf2:swp2 <--> spine2:eth2
INFO[0002] Creating virtual wire: leaf2:swp3 <--> h2:eth1
INFO[0003] Adding containerlab host entries to /etc/hosts file
INFO[0003] 🎉 New containerlab version 0.24.1 is available! Release notes: https://containerlab.srlinux.dev/rn/0.24/#0241
Run 'containerlab version upgrade' to upgrade or go check other installation options at https://containerlab.srlinux.dev/install/
+----+---------------------------------+--------------+------------------------------+---------+---------+------------------+----------------------+
| #  |              Name               | Container ID |            Image             |  Kind   |  State  |   IPv4 Address   |     IPv6 Address     |
+----+---------------------------------+--------------+------------------------------+---------+---------+------------------+----------------------+
|  1 | clab-evpn-l2-multivendor-h1     | e54edb974d39 | networkop/host:ifreload      | linux   | running | 172.20.20.21/24  | 2001:172:20:20::4/64 |
|  2 | clab-evpn-l2-multivendor-h2     | 11a73b7514c0 | networkop/host:ifreload      | linux   | running | 172.20.20.22/24  | 2001:172:20:20::5/64 |
|  3 | clab-evpn-l2-multivendor-h3     | 9f22eff7b0ca | networkop/host:ifreload      | linux   | running | 172.20.20.23/24  | 2001:172:20:20::8/64 |
|  4 | clab-evpn-l2-multivendor-h4     | a02ead147994 | networkop/host:ifreload      | linux   | running | 172.20.20.24/24  | 2001:172:20:20::3/64 |
|  5 | clab-evpn-l2-multivendor-leaf1  | ff2871985b4e | vrnetlab/vr-veos:4.27.2F     | vr-veos | running | 172.20.20.11/24  | 2001:172:20:20::2/64 |
|  6 | clab-evpn-l2-multivendor-leaf2  | 86191b18f7f9 | docker.io/networkop/cx:4.4.0 | cvx     | running | 172.17.0.2/24    | N/A                  |
|  7 | clab-evpn-l2-multivendor-leaf3  | 8a317c31929d | vrnetlab/vr-n9kv:9.3.9       | vr-n9kv | running | 172.20.20.13/24  | 2001:172:20:20::9/64 |
|  8 | clab-evpn-l2-multivendor-leaf4  | 690414536e2b | vrnetlab/vr-vqfx:20.2R1.10   | vr-vqfx | running | 172.20.20.14/24  | 2001:172:20:20::6/64 |
|  9 | clab-evpn-l2-multivendor-spine1 | b628b4de29b9 | vrnetlab/vr-veos:4.27.2F     | vr-veos | running | 172.20.20.101/24 | 2001:172:20:20::a/64 |
| 10 | clab-evpn-l2-multivendor-spine2 | 3f426a4c2db4 | vrnetlab/vr-veos:4.27.2F     | vr-veos | running | 172.20.20.102/24 | 2001:172:20:20::7/64 |
+----+---------------------------------+--------------+------------------------------+---------+---------+------------------+----------------------+
Remember to wait till the containers are reported as healthy. If they remain unhealthy, then something was wrong with the docker build and you should probably re-visit that.
root@aninchat-ubuntu:~/clabs/multivendor# docker ps
CONTAINER ID   IMAGE                        COMMAND                  CREATED         STATUS                   PORTS                                                                                       NAMES
86191b18f7f9   networkop/ignite:dev         "/usr/local/bin/igni…"   8 minutes ago   Up 7 minutes                                                                                                         ignite-b01b941136a18c36
b628b4de29b9   vrnetlab/vr-veos:4.27.2F     "/launch.py --userna…"   8 minutes ago   Up 7 minutes (healthy)   22/tcp, 80/tcp, 443/tcp, 830/tcp, 5000/tcp, 6030/tcp, 10000-10099/tcp, 57400/tcp, 161/udp   clab-evpn-l2-multivendor-spine1
8a317c31929d   vrnetlab/vr-n9kv:9.3.9       "/launch.py --userna…"   8 minutes ago   Up 7 minutes (healthy)   22/tcp, 80/tcp, 443/tcp, 830/tcp, 5000/tcp, 6030/tcp, 10000-10099/tcp, 57400/tcp, 161/udp   clab-evpn-l2-multivendor-leaf3
ff2871985b4e   vrnetlab/vr-veos:4.27.2F     "/launch.py --userna…"   8 minutes ago   Up 8 minutes (healthy)   22/tcp, 80/tcp, 443/tcp, 830/tcp, 5000/tcp, 6030/tcp, 10000-10099/tcp, 57400/tcp, 161/udp   clab-evpn-l2-multivendor-leaf1
3f426a4c2db4   vrnetlab/vr-veos:4.27.2F     "/launch.py --userna…"   8 minutes ago   Up 7 minutes (healthy)   22/tcp, 80/tcp, 443/tcp, 830/tcp, 5000/tcp, 6030/tcp, 10000-10099/tcp, 57400/tcp, 161/udp   clab-evpn-l2-multivendor-spine2
690414536e2b   vrnetlab/vr-vqfx:20.2R1.10   "/launch.py --userna…"   8 minutes ago   Up 7 minutes (healthy)   22/tcp, 830/tcp, 5000/tcp, 10000-10099/tcp, 161/udp                                         clab-evpn-l2-multivendor-leaf4
e54edb974d39   networkop/host:ifreload      "/entrypoint.sh"         8 minutes ago   Up 7 minutes                                                                                                         clab-evpn-l2-multivendor-h1
11a73b7514c0   networkop/host:ifreload      "/entrypoint.sh"         8 minutes ago   Up 7 minutes                                                                                                         clab-evpn-l2-multivendor-h2
a02ead147994   networkop/host:ifreload      "/entrypoint.sh"         8 minutes ago   Up 7 minutes                                                                                                         clab-evpn-l2-multivendor-h4
9f22eff7b0ca   networkop/host:ifreload      "/entrypoint.sh"         8 minutes ago   Up 7 minutes                                                                                                         clab-evpn-l2-multivendor-h3
Automating the fabric bringup
In order to automate the fabric bringup, I’ve written a (terrible) Ansible script. The script can be found here. This is meant to configure the p2p interfaces between the leafs and the spines, underlay routing (BGP), overlay routing (BGP EVPN), and all of the necessary VXLAN and VLAN configuration for a L2 overlay.
Ansible inventory and variables for fabric deployment
The inventory for the script is built from the IP addresses that were statically assigned in the containerlab topology file. The inventory is also crucial to grouping together devices, allowing for group variables to kick in:
root@aninchat-ubuntu:~/clabs/multivendor# cat inventory.yml
---

all:
        children:
                leafs:
                        hosts:
                                leaf1:
                                        ansible_host: 172.20.20.11
                                leaf2:
                                        ansible_host: 172.17.0.2
                                leaf3:
                                        ansible_host: 172.20.20.13
                                leaf4:
                                        ansible_host: 172.20.20.14
                spines:
                        hosts:
                                spine1:
                                        ansible_host: 172.20.20.101
                                spine2:
                                        ansible_host: 172.20.20.102
                nxos:
                        hosts:
                                leaf3:
                junos:
                        hosts:
                                leaf4:
                eos:
                        hosts:
                                spine1:
                                spine2:
                                leaf1:
                cumulus:
                        hosts:
                                leaf2:
Each fabric node has its own host variables defined under ‘host_vars’.
root@aninchat-ubuntu:~/clabs/multivendor# tree host_vars/
host_vars/
├── leaf1.yml
├── leaf2.yml
├── leaf3.yml
├── leaf4.yml
├── spine1.yml
└── spine2.yml
Let’s take leaf1 as an example to see what host specific variables we’ve defined:
root@aninchat-ubuntu:~/clabs/multivendor# cat host_vars/leaf1.yml
---

interfaces:
        Loopback0:
                address: '192.168.100.1/32'
        Ethernet1:
                address: '10.10.10.1/31'
        Ethernet2:
                address: '10.10.10.9/31'
bgp:
        as_number: 64521
        router_id: '192.168.100.1'
        neighbors:
                10.10.10.0:
                        remote-as: 65500
                        ipv4: true
                        evpn: true
                        send-community: true
                        loopback: '192.168.101.1'
                10.10.10.8:
                        remote-as: 65500
                        ipv4: true
                        evpn: true
                        send-community: true
                        loopback: '192.168.101.2'
vlans:
        100:
                vni: 10100
                name: 'VLAN100-VNI10100'
                interfaces:
                        - 'Ethernet3'
                rd: '192.168.100.1:1'
                export_rt: '100:100'
                import_rt: '100:100'
We’re essentially defining fabric specific attributes that will be used to build the configuration of the device via a jinja2 template in the ansible playbook.
Grouping together devices allows us to now define group variables as well, under ‘group_vars’:
root@aninchat-ubuntu:~/clabs/multivendor# tree group_vars/
group_vars/
├── cumulus.yml
├── eos.yml
├── junos.yml
├── leafs.yml
├── nxos.yml
└── spines.yml
These mostly contain connection details, and some other variables I’ve set to create some conditionals in the ansible script. For example, let’s look at the eos.yml file from ‘group_vars’:
root@aninchat-ubuntu:~/clabs/multivendor# cat group_vars/eos.yml
---

ansible_connection: ansible.netcommon.network_cli
ansible_network_os: eos
ansible_user: admin
ansible_password: admin
platform: 'eos'
ansible_become: yes
ansible_become_method: enable
To ensure that your inventory is built as expected, and all of the variables are inherited correctly, we can use the ‘ansible-inventory’ command as follows (only a snippet is shown here for brevity):
root@aninchat-ubuntu:~/clabs/multivendor# ansible-inventory inventory.yml --list
{
    "_meta": {
        "hostvars": {
            "leaf1": {
                "ansible_become": true,
                "ansible_become_method": "enable",
                "ansible_connection": "ansible.netcommon.network_cli",
                "ansible_host": "172.20.20.11",
                "ansible_network_os": "eos",
                "ansible_password": "admin",
                "ansible_user": "admin",
                "bgp": {
                    "as_number": 64521,
                    "neighbors": {
                        "10.10.10.0": {
                            "evpn": true,
                            "ipv4": true,
                            "loopback": "192.168.101.1",
                            "remote-as": 65500,
                            "send-community": true
                        },
                        "10.10.10.8": {
                            "evpn": true,
                            "ipv4": true,
                            "loopback": "192.168.101.2",
                            "remote-as": 65500,
                            "send-community": true
                        }
                    },
                    "router_id": "192.168.100.1"
                },
                "interfaces": {
                    "Ethernet1": {
                        "address": "10.10.10.1/31"
                    },
                    "Ethernet2": {
                        "address": "10.10.10.9/31"
                    },
                    "Loopback0": {
                        "address": "192.168.100.1/32"
                    }
                },
                "platform": "eos",
                "role": "leaf",
                "vlans": {
                    "100": {
                        "export_rt": "100:100",
                        "import_rt": "100:100",
                        "interfaces": [
                            "Ethernet3"
                        ],
                        "name": "VLAN100-VNI10100",
                        "rd": "192.168.100.1:1",
                        "vni": 10100
                    }
                }
            },

* snip *

    "all": {
        "children": [
            "cumulus",
            "eos",
            "junos",
            "leafs",
            "nxos",
            "spines",
            "ungrouped"
        ]
    },
    "cumulus": {
        "hosts": [
            "leaf2"
        ]
    },
    "eos": {
        "hosts": [
            "leaf1",
            "spine1",
            "spine2"
        ]
    },
    "junos": {
        "hosts": [
            "leaf4"
        ]
    },
    "leafs": {
        "hosts": [
            "leaf1",
            "leaf2",
            "leaf3",
            "leaf4"
        ]
    },
    "nxos": {
        "hosts": [
            "leaf3"
        ]
    },
    "spines": {
        "hosts": [
            "spine1",
            "spine2"
        ]
    }
}
Jinja2 templates for building device configuration
Jinja2 templates are awesome to build the actual configuration. This also lends very well into a multivendor deployment, where each vendor may have a different style of configuration and you cannot have a pre-defined set for all network operating systems. All templates are stored under the ‘templates’ folder:
root@aninchat-ubuntu:~/clabs/multivendor# tree templates/
templates/
├── eos
│   ├── access_interfaces_to_vlan_mapping.j2
│   ├── bgp_evpn_vlan_vni_addition.j2
│   ├── bgp_leaf.j2
│   ├── bgp_spine.j2
│   ├── route_map.j2
│   ├── underlay_interfaces.j2
│   ├── vlans_create.j2
│   └── vxlan_interface_map_vni.j2
├── junos
│   ├── access_interfaces_to_vlan_mapping.j2
│   ├── bgp_evpn_vlan_vni_addition.j2
│   ├── bgp_leaf.j2
│   ├── route_map.j2
│   ├── underlay_interfaces.j2
│   ├── vlans_create.j2
│   └── vxlan_interface_map_vni.j2
└── nxos
    ├── access_interfaces_to_vlan_mapping.j2
    ├── bgp_evpn_vlan_vni_addition.j2
    ├── bgp_leaf.j2
    ├── route_map.j2
    ├── underlay_interfaces.j2
    ├── vlans_create.j2
    └── vxlan_interface_map_vni.j2

4 directories, 23 files
The directory is structured per vendor/OS (excluding Cumulus, see quirks section below for this). For every vendor, I have a jinja2 template for different parts of the configuration. For example, let’s take EOS and NXOS to compaare.
For EOS:
root@aninchat-ubuntu:~/clabs/multivendor# cat templates/eos/underlay_interfaces.j2
{% for interface in interfaces -%}
interface {{ interface }}
   {% if interface == 'Loopback0' -%}
   ip address {{ interfaces[interface].address }}
   {% else -%}
   no switchport
   ip address {{ interfaces[interface].address }}
   {% endif %}
{% endfor %}
For NXOS:
root@aninchat-ubuntu:~/clabs/multivendor# cat templates/nxos/underlay_interfaces.j2
feature lldp
{% for interface in interfaces -%}
interface {{ interface }}
  {% if interface == 'loopback0' -%}
  ip address {{ interfaces[interface].address }}
  {% else -%}
  no switchport
  ip address {{ interfaces[interface].address }}
  no shutdown
  {% endif %}
{% endfor -%}
As you can see, there are three spaces for EOS configuration, while there are two spaces for NXOS configuration. This becomes crucial for idempotency. This jinja2 template is finally used in the playbook, as follows:
          - name: configure interfaces on network devices
            block:
                    - name: configure interfaces on non-cumulus switches
                      when: platform != 'cumulus'
                      cli_config:
                              config: "{{ lookup('template', 'templates/{{ platform }}/underlay_interfaces.j2') }}"
‘{{ platform }}’ is substituted in real time with the actual platform variable from the flat inventory. This simple hierarchy structure allows for easy lookup into a vendor specific template.
Small quirks and other noteworthy points regarding fabric automation
The playbook can now be executed to automate the full deployment. Couple of noteworthy things, specific to some of these vendors and their quirks:
- with Arista’s EOS (and vEOS), you need to enable multi-agent service model (the default is ribd, which is single agent). The catch here is that after enabling this, the device must be reloaded - this is true even for the actual hardware platforms, and not just vEOS. As part of this automation, I am enabling multi-agent, but you, as the user, must reload the box at least once to get BGP peerings to come up (you’ll see IPv4 unicast BGP come up, but no other address family will work until a reload).
- Juniper’s vQFX takes a bit to load all of the network interfaces (the ‘xe’ interfaces). You need to be patient. You can verify if the interfaces have come up using the ‘show interfaces terse’ command. Until then, do not run the ansible playbook.
Outside of these things, there were certain places where my hands felt like they were tied while building the actual ansible playbook. For example, for Cumulus' automation, I use the ‘community.network.nclu’ ansible module. This module can take in a template for configuration, however, it doesn’t seem to take a template path and instead, expects you to define an inline template, which is really odd. This bloats up the playbook considerably, an example (taken from the playbook) below:
          - name: configure interfaces on network devices
            block:
                    - name: configure interfaces on non-cumulus switches
                      when: platform != 'cumulus'
                      cli_config:
                              config: "{{ lookup('template', 'templates/{{ platform }}/underlay_interfaces.j2') }}"
                    - name: configure interfaces on cumulus devices
                      when: platform == 'cumulus'
                      community.network.nclu:
                              template: |
                                      {% for interface in interfaces -%}
                                      {% if interface == 'loopback0' -%}
                                      add loopback lo ip address {{ interfaces[interface].address }}
                                      {% else -%}
                                      add interface {{ interface }} ip address {{ interfaces[interface].address }}
                                      {% endif -%}
                                      {% endfor -%}
                              commit: yes
Along the same lines, for all other vendors I could use the network_cli connection but not for Cumulus. Because of this, each task in my playbook had to be divided into blocks, where one block would configure non-cumulus switches and the other would configure cumulus switches. This was done using simple conditional checks (using the ‘when’ statement in Ansible).
Verification of the EVPN fabric
Basic connectivity checks
In this section, let’s look at the fabric and if everything is automated correctly or not. Both the spines have an IPv4 unicast peering with all the leafs:
// spine1

spine1#show bgp ipv4 unicast summary
BGP summary information for VRF default
Router identifier 192.168.101.1, local AS number 65500
Neighbor Status Codes: m - Under maintenance
  Neighbor   V AS           MsgRcvd   MsgSent  InQ OutQ  Up/Down State   PfxRcd PfxAcc
  10.10.10.1 4 64521            115       117    0    0 01:32:25 Estab   1      1
  10.10.10.3 4 64522           1860      2172    0    0 01:32:25 Estab   1      1
  10.10.10.5 4 64523             97       115    0    0 01:32:25 Estab   1      1
  10.10.10.7 4 64524            207       223    0    0 01:32:26 Estab   1      1

// spine2

spine2#show bgp ipv4 unicast summary
BGP summary information for VRF default
Router identifier 192.168.101.2, local AS number 65500
Neighbor Status Codes: m - Under maintenance
  Neighbor    V AS           MsgRcvd   MsgSent  InQ OutQ  Up/Down State   PfxRcd PfxAcc
  10.10.10.9  4 64521            119       119    0    0 01:34:07 Estab   1      1
  10.10.10.11 4 64522           1893      2211    0    0 01:34:07 Estab   1      1
  10.10.10.13 4 64523             99       118    0    0 01:34:06 Estab   1      1
  10.10.10.15 4 64524            211       226    0    0 01:34:06 Estab   1      1
The EVPN peering is also up:
// spine1

spine1#show bgp evpn summary
BGP summary information for VRF default
Router identifier 192.168.101.1, local AS number 65500
Neighbor Status Codes: m - Under maintenance
  Neighbor      V AS           MsgRcvd   MsgSent  InQ OutQ  Up/Down State   PfxRcd PfxAcc
  192.168.100.1 4 64521            116       119    0    0 01:33:50 Estab   2      2
  192.168.100.2 4 64522           1887      2211    0    0 01:33:50 Estab   3      3
  192.168.100.3 4 64523             99       117    0    0 01:33:49 Estab   2      2
  192.168.100.4 4 64524            211       229    0    0 01:33:51 Estab   2      2

// spine2

spine2#show bgp evpn summary
BGP summary information for VRF default
Router identifier 192.168.101.2, local AS number 65500
Neighbor Status Codes: m - Under maintenance
  Neighbor      V AS           MsgRcvd   MsgSent  InQ OutQ  Up/Down State   PfxRcd PfxAcc
  192.168.100.1 4 64521            120       121    0    0 01:34:18 Estab   2      2
  192.168.100.2 4 64522           1896      2219    0    0 01:34:16 Estab   3      3
  192.168.100.3 4 64523            100       118    0    0 01:34:15 Estab   2      2
  192.168.100.4 4 64524            212       230    0    0 01:34:16 Estab   2      2
Let’s take leaf1 now and confirm if it has received the loopback of all other leafs, and if it has reachability to these loopbacks:
leaf1#show ip route

VRF: default
Codes: C - connected, S - static, K - kernel,
       O - OSPF, IA - OSPF inter area, E1 - OSPF external type 1,
       E2 - OSPF external type 2, N1 - OSPF NSSA external type 1,
       N2 - OSPF NSSA external type2, B - Other BGP Routes,
       B I - iBGP, B E - eBGP, R - RIP, I L1 - IS-IS level 1,
       I L2 - IS-IS level 2, O3 - OSPFv3, A B - BGP Aggregate,
       A O - OSPF Summary, NG - Nexthop Group Static Route,
       V - VXLAN Control Service, M - Martian,
       DH - DHCP client installed default route,
       DP - Dynamic Policy Route, L - VRF Leaked,
       G  - gRIBI, RC - Route Cache Route

Gateway of last resort is not set

 C        10.0.0.0/24 is directly connected, Management1
 C        10.10.10.0/31 is directly connected, Ethernet1
 C        10.10.10.8/31 is directly connected, Ethernet2
 C        192.168.100.1/32 is directly connected, Loopback0
 B E      192.168.100.2/32 [200/0] via 10.10.10.0, Ethernet1
                                   via 10.10.10.8, Ethernet2
 B E      192.168.100.3/32 [200/0] via 10.10.10.0, Ethernet1
                                   via 10.10.10.8, Ethernet2
 B E      192.168.100.4/32 [200/0] via 10.10.10.0, Ethernet1
                                   via 10.10.10.8, Ethernet2
 B E      192.168.101.1/32 [200/0] via 10.10.10.0, Ethernet1
 B E      192.168.101.2/32 [200/0] via 10.10.10.8, Ethernet2
We see all the loopbacks in there, which is good. Let’s ping to confirm reachability, using leaf1s loopback as the source:
leaf1#ping 192.168.100.2 source 192.168.100.1
PING 192.168.100.2 (192.168.100.2) from 192.168.100.1 : 72(100) bytes of data.
80 bytes from 192.168.100.2: icmp_seq=1 ttl=63 time=9.03 ms
80 bytes from 192.168.100.2: icmp_seq=2 ttl=63 time=14.8 ms
80 bytes from 192.168.100.2: icmp_seq=3 ttl=63 time=9.03 ms
80 bytes from 192.168.100.2: icmp_seq=4 ttl=63 time=9.23 ms
80 bytes from 192.168.100.2: icmp_seq=5 ttl=63 time=12.1 ms

--- 192.168.100.2 ping statistics ---
5 packets transmitted, 5 received, 0% packet loss, time 41ms
rtt min/avg/max/mdev = 9.034/10.847/14.807/2.305 ms, pipe 2, ipg/ewma 10.474/9.926 ms

leaf1#ping 192.168.100.3 source 192.168.100.1
PING 192.168.100.3 (192.168.100.3) from 192.168.100.1 : 72(100) bytes of data.
80 bytes from 192.168.100.3: icmp_seq=1 ttl=254 time=11.6 ms
80 bytes from 192.168.100.3: icmp_seq=2 ttl=254 time=12.1 ms
80 bytes from 192.168.100.3: icmp_seq=3 ttl=254 time=8.81 ms
80 bytes from 192.168.100.3: icmp_seq=4 ttl=254 time=7.50 ms
80 bytes from 192.168.100.3: icmp_seq=5 ttl=254 time=8.88 ms

--- 192.168.100.3 ping statistics ---
5 packets transmitted, 5 received, 0% packet loss, time 47ms
rtt min/avg/max/mdev = 7.502/9.783/12.108/1.774 ms, pipe 2, ipg/ewma 11.764/10.594 ms

leaf1#ping 192.168.100.4 source 192.168.100.1
PING 192.168.100.4 (192.168.100.4) from 192.168.100.1 : 72(100) bytes of data.
80 bytes from 192.168.100.4: icmp_seq=1 ttl=63 time=112 ms
80 bytes from 192.168.100.4: icmp_seq=2 ttl=63 time=200 ms
80 bytes from 192.168.100.4: icmp_seq=3 ttl=63 time=192 ms
80 bytes from 192.168.100.4: icmp_seq=4 ttl=63 time=185 ms
80 bytes from 192.168.100.4: icmp_seq=5 ttl=63 time=176 ms

--- 192.168.100.4 ping statistics ---
5 packets transmitted, 5 received, 0% packet loss, time 42ms
rtt min/avg/max/mdev = 112.935/173.590/200.128/31.282 ms, pipe 5, ipg/ewma 10.747/143.784 ms
Analyzing the EVPN routes for interoperability issues
Clue #1
Let’s start by looking at some EVPN routes now. I am obviously aware of some of the interoperability issues in this network, so I’ll start dropping hints to help you along the way.
First, because I am using ingress replication, I should see a type-3 IMET route generated by each leaf. We’ll stay on leaf1 for this analysis:
leaf1#show bgp evpn route-type imet
BGP routing table information for VRF default
Router identifier 192.168.100.1, local AS number 64521
Route status codes: s - suppressed, * - valid, > - active, E - ECMP head, e - ECMP
                    S - Stale, c - Contributing to ECMP, b - backup
                    % - Pending BGP convergence
Origin codes: i - IGP, e - EGP, ? - incomplete
AS Path Attributes: Or-ID - Originator ID, C-LST - Cluster List, LL Nexthop - Link Local Nexthop

          Network                Next Hop              Metric  LocPref Weight  Path
 * >Ec   RD: 192.168.100.2:2 imet 192.168.100.2
                                 192.168.100.2         -       100     0       65500 64522 i
 *  ec   RD: 192.168.100.2:2 imet 192.168.100.2
                                 192.168.100.2         -       100     0       65500 64522 i
 * >Ec   RD: 192.168.100.3:3 imet 192.168.100.3
                                 192.168.100.3         -       100     0       65500 64523 i
 *  ec   RD: 192.168.100.3:3 imet 192.168.100.3
                                 192.168.100.3         -       100     0       65500 64523 i
 * >     RD: 192.168.100.1:1 imet 192.168.100.1
                                 -                     -       -       0       i
 * >Ec   RD: 192.168.100.4:4 imet 10100 192.168.100.4
                                 192.168.100.4         -       100     0       65500 64524 i
 *  ec   RD: 192.168.100.4:4 imet 10100 192.168.100.4
                                 192.168.100.4         -       100     0       65500 64524 i
Notice anything weird in the output here? Anything that stands out? Let’s look at two routes for comparison, the imet route from leaf2 and leaf4:
leaf1#show bgp evpn route-type imet rd 192.168.100.2:2 detail
BGP routing table information for VRF default
Router identifier 192.168.100.1, local AS number 64521
BGP routing table entry for imet 192.168.100.2, Route Distinguisher: 192.168.100.2:2
 Paths: 2 available
  65500 64522
    192.168.100.2 from 192.168.101.1 (192.168.101.1)
      Origin IGP, metric -, localpref 100, weight 0, valid, external, ECMP head, ECMP, best, ECMP contributor
      Extended Community: Route-Target-AS:100:100 TunnelEncap:tunnelTypeVxlan
      VNI: 10100
      PMSI Tunnel: Ingress Replication, MPLS Label: 10100, Leaf Information Required: false, Tunnel ID: 192.168.100.2
  65500 64522
    192.168.100.2 from 192.168.101.2 (192.168.101.2)
      Origin IGP, metric -, localpref 100, weight 0, valid, external, ECMP, ECMP contributor
      Extended Community: Route-Target-AS:100:100 TunnelEncap:tunnelTypeVxlan
      VNI: 10100
      PMSI Tunnel: Ingress Replication, MPLS Label: 10100, Leaf Information Required: false, Tunnel ID: 192.168.100.2
The same thing for leaf4 now:
leaf1#show bgp evpn route-type imet rd 192.168.100.4:4 detail
BGP routing table information for VRF default
Router identifier 192.168.100.1, local AS number 64521
BGP routing table entry for imet 10100 192.168.100.4, Route Distinguisher: 192.168.100.4:4
 Paths: 2 available
  65500 64524
    192.168.100.4 from 192.168.101.1 (192.168.101.1)
      Origin IGP, metric -, localpref 100, weight 0, valid, external, ECMP head, ECMP, best, ECMP contributor
      Extended Community: Route-Target-AS:100:100 TunnelEncap:tunnelTypeVxlan
      VNI: 10100
      PMSI Tunnel: Ingress Replication, MPLS Label: 10100, Leaf Information Required: false, Tunnel ID: 192.168.100.4
  65500 64524
    192.168.100.4 from 192.168.101.2 (192.168.101.2)
      Origin IGP, metric -, localpref 100, weight 0, valid, external, ECMP, ECMP contributor
      Extended Community: Route-Target-AS:100:100 TunnelEncap:tunnelTypeVxlan
      VNI: 10100
      PMSI Tunnel: Ingress Replication, MPLS Label: 10100, Leaf Information Required: false, Tunnel ID: 192.168.100.4
Do you see it yet?
We should also see some type-2 macip routes since all my hosts are up and running:
leaf1#show bgp evpn route-type mac-ip
BGP routing table information for VRF default
Router identifier 192.168.100.1, local AS number 64521
Route status codes: s - suppressed, * - valid, > - active, E - ECMP head, e - ECMP
                    S - Stale, c - Contributing to ECMP, b - backup
                    % - Pending BGP convergence
Origin codes: i - IGP, e - EGP, ? - incomplete
AS Path Attributes: Or-ID - Originator ID, C-LST - Cluster List, LL Nexthop - Link Local Nexthop

          Network                Next Hop              Metric  LocPref Weight  Path
 * >Ec   RD: 192.168.100.3:3 mac-ip aac1.ab48.5bcf
                                 192.168.100.3         -       100     0       65500 64523 i
 *  ec   RD: 192.168.100.3:3 mac-ip aac1.ab48.5bcf
                                 192.168.100.3         -       100     0       65500 64523 i
 * >Ec   RD: 192.168.100.2:2 mac-ip aac1.ab93.c413
                                 192.168.100.2         -       100     0       65500 64522 i
 *  ec   RD: 192.168.100.2:2 mac-ip aac1.ab93.c413
                                 192.168.100.2         -       100     0       65500 64522 i
 * >Ec   RD: 192.168.100.2:2 mac-ip aac1.ab93.c413 fe80::a8c1:abff:fe93:c413
                                 192.168.100.2         -       100     0       65500 64522 i
 *  ec   RD: 192.168.100.2:2 mac-ip aac1.ab93.c413 fe80::a8c1:abff:fe93:c413
                                 192.168.100.2         -       100     0       65500 64522 i
 * >     RD: 192.168.100.1:1 mac-ip aac1.abde.327e
                                 -                     -       -       0       i
 * >Ec   RD: 192.168.100.4:4 mac-ip 10100 aac1.abe8.a87d
                                 192.168.100.4         -       100     0       65500 64524 i
 *  ec   RD: 192.168.100.4:4 mac-ip 10100 aac1.abe8.a87d
                                 192.168.100.4         -       100     0       65500 64524 i
This is good, we’ve learnt a type-2 macip route for all our hosts. But again, something is odd here - one of the leafs is slightly different from the others. Which one?
Clue #2
Since we’re using ingression replication, we should have a flood list of all our leafs via the type-3 imet route. Let’s look at the flood list on leaf1:
leaf1#show vxlan flood vtep vlan 100
          VXLAN Flood VTEP Table
--------------------------------------------------------------------------------

VLANS                            Ip Address
-----------------------------   ------------------------------------------------
100                             192.168.100.2   192.168.100.3
That’s interesting - leaf4 (vQFX) is not listed in the flood list. Can you figure out why?
Clue #3
We looked at the type-2 macip routes but we never really saw the MAC address table. Since this is L2 overlay only, we should see the host MAC addresses installed in this table, with a vtep as the next hop.
Let’s look at leaf1s table now:
leaf1#show mac address-table unicast
          Mac Address Table
------------------------------------------------------------------

Vlan    Mac Address       Type        Ports      Moves   Last Move
----    -----------       ----        -----      -----   ---------
 100    aac1.ab48.5bcf    DYNAMIC     Vx1        1       2:36:43 ago
 100    aac1.ab93.c413    DYNAMIC     Vx1        1       2:37:12 ago
 100    aac1.abde.327e    DYNAMIC     Et3        1       2:32:54 ago
Total Mac Addresses for this criterion: 3
There are only three addresses, but there should be four. You probably know which one is missing - it is h4, the host behind leaf4. But why?
What’s really happening
You’ve probably solved it by now, but I’ll break it down anyway. If you go back and check, leaf1 did receive both the type-2 macip route for the host, h4, and the type-3 imet route for ingress replication of BUM traffic.
Let’s confirm again, and take a detailed look at it this time:
leaf1#show bgp evpn route mac-ip aa:c1:ab:e8:a8:7d detail
BGP routing table information for VRF default
Router identifier 192.168.100.1, local AS number 64521
BGP routing table entry for mac-ip 10100 aac1.abe8.a87d, Route Distinguisher: 192.168.100.4:4
 Paths: 2 available
  65500 64524
    192.168.100.4 from 192.168.101.1 (192.168.101.1)
      Origin IGP, metric -, localpref 100, weight 0, valid, external, ECMP head, ECMP, best, ECMP contributor
      Extended Community: Route-Target-AS:100:100 TunnelEncap:tunnelTypeVxlan
      VNI: 10100 ESI: 0000:0000:0000:0000:0000
  65500 64524
    192.168.100.4 from 192.168.101.2 (192.168.101.2)
      Origin IGP, metric -, localpref 100, weight 0, valid, external, ECMP, ECMP contributor
      Extended Community: Route-Target-AS:100:100 TunnelEncap:tunnelTypeVxlan
      VNI: 10100 ESI: 0000:0000:0000:0000:0000

leaf1#show bgp evpn route-type imet rd 192.168.100.4:4 detail
BGP routing table information for VRF default
Router identifier 192.168.100.1, local AS number 64521
BGP routing table entry for imet 10100 192.168.100.4, Route Distinguisher: 192.168.100.4:4
 Paths: 2 available
  65500 64524
    192.168.100.4 from 192.168.101.1 (192.168.101.1)
      Origin IGP, metric -, localpref 100, weight 0, valid, external, ECMP head, ECMP, best, ECMP contributor
      Extended Community: Route-Target-AS:100:100 TunnelEncap:tunnelTypeVxlan
      VNI: 10100
      PMSI Tunnel: Ingress Replication, MPLS Label: 10100, Leaf Information Required: false, Tunnel ID: 192.168.100.4
  65500 64524
    192.168.100.4 from 192.168.101.2 (192.168.101.2)
      Origin IGP, metric -, localpref 100, weight 0, valid, external, ECMP, ECMP contributor
      Extended Community: Route-Target-AS:100:100 TunnelEncap:tunnelTypeVxlan
      VNI: 10100
      PMSI Tunnel: Ingress Replication, MPLS Label: 10100, Leaf Information Required: false, Tunnel ID: 192.168.100.4
If you look closely enough, you see that there is a value attached to the MAC address for the type-2 route and to the loopback (or vtep) address for the type-3 imet route.
* snip *

BGP routing table entry for mac-ip 10100 aac1.abe8.a87d, Route Distinguisher: 192.168.100.4:4

* snip *
See that ‘10100’ in there? Well, that’s the Ethernet Tag ID. Let’s take a BGP packet capture and look at this in the BGP update itself to confirm. I’m going to clear my BGP peerings on leaf1 so the updates are sent again for us to capture it.
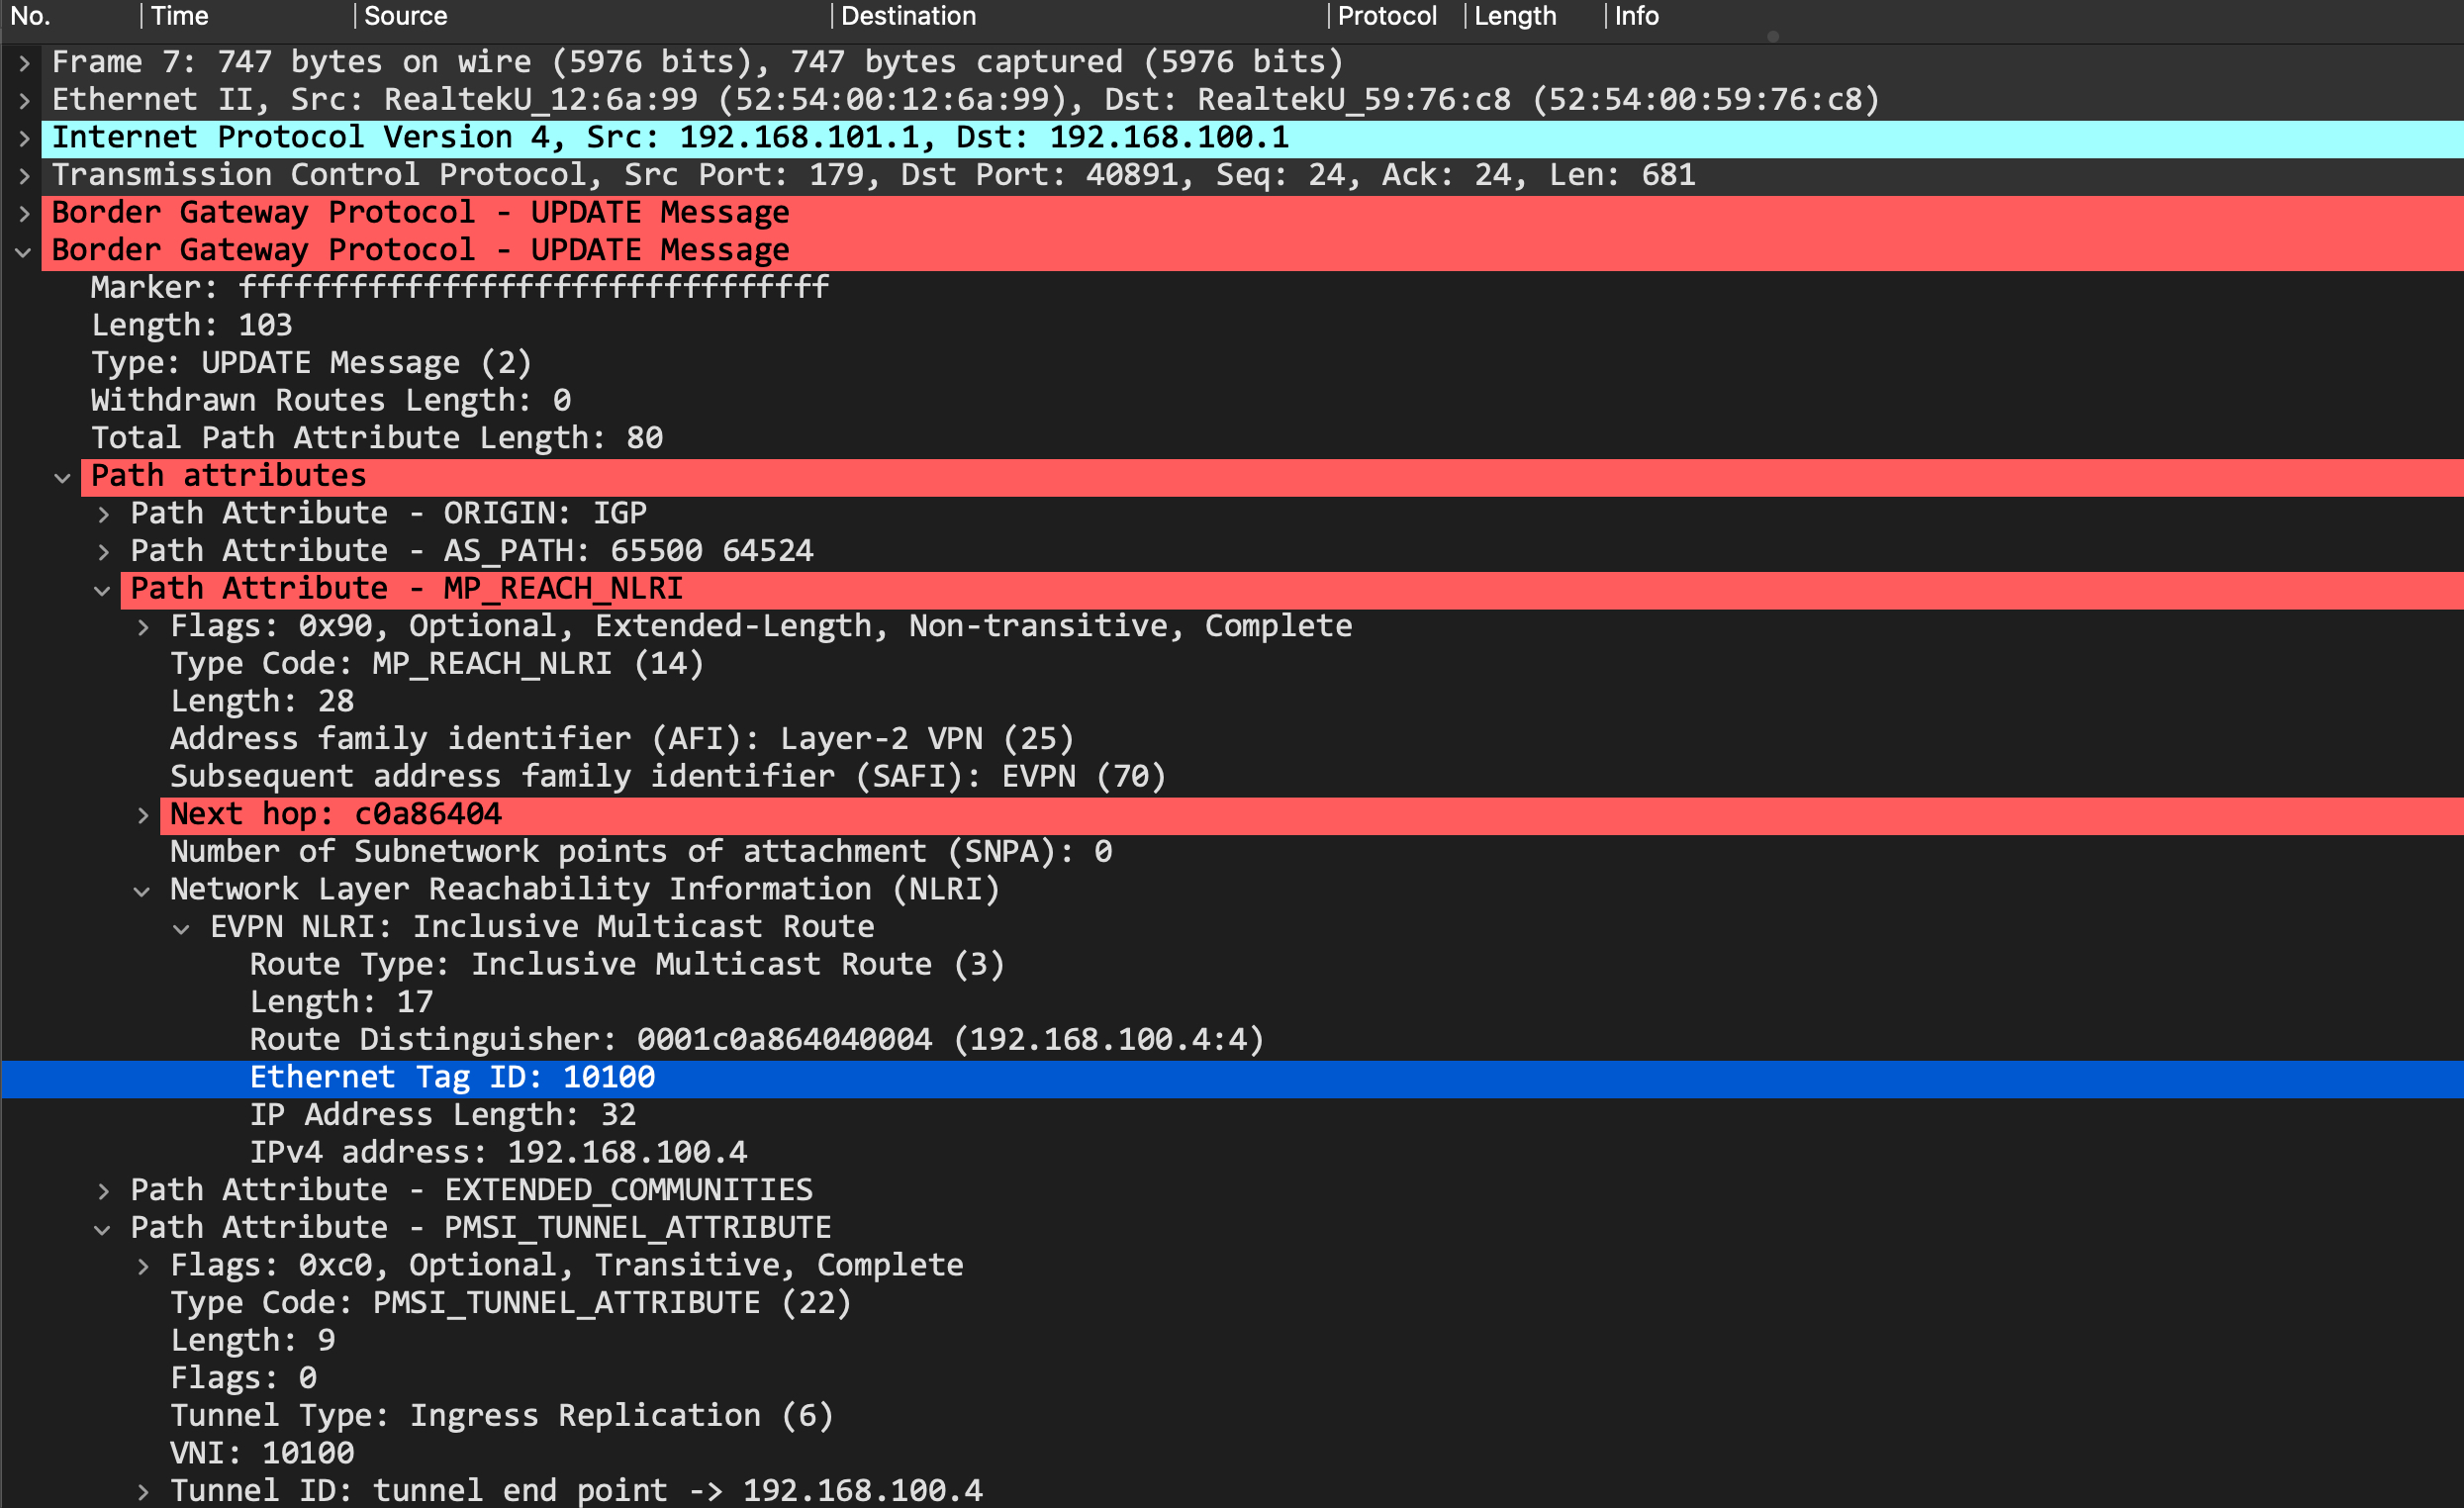
This it the type-3 imet route update:
And this is the type-2 macip route update:
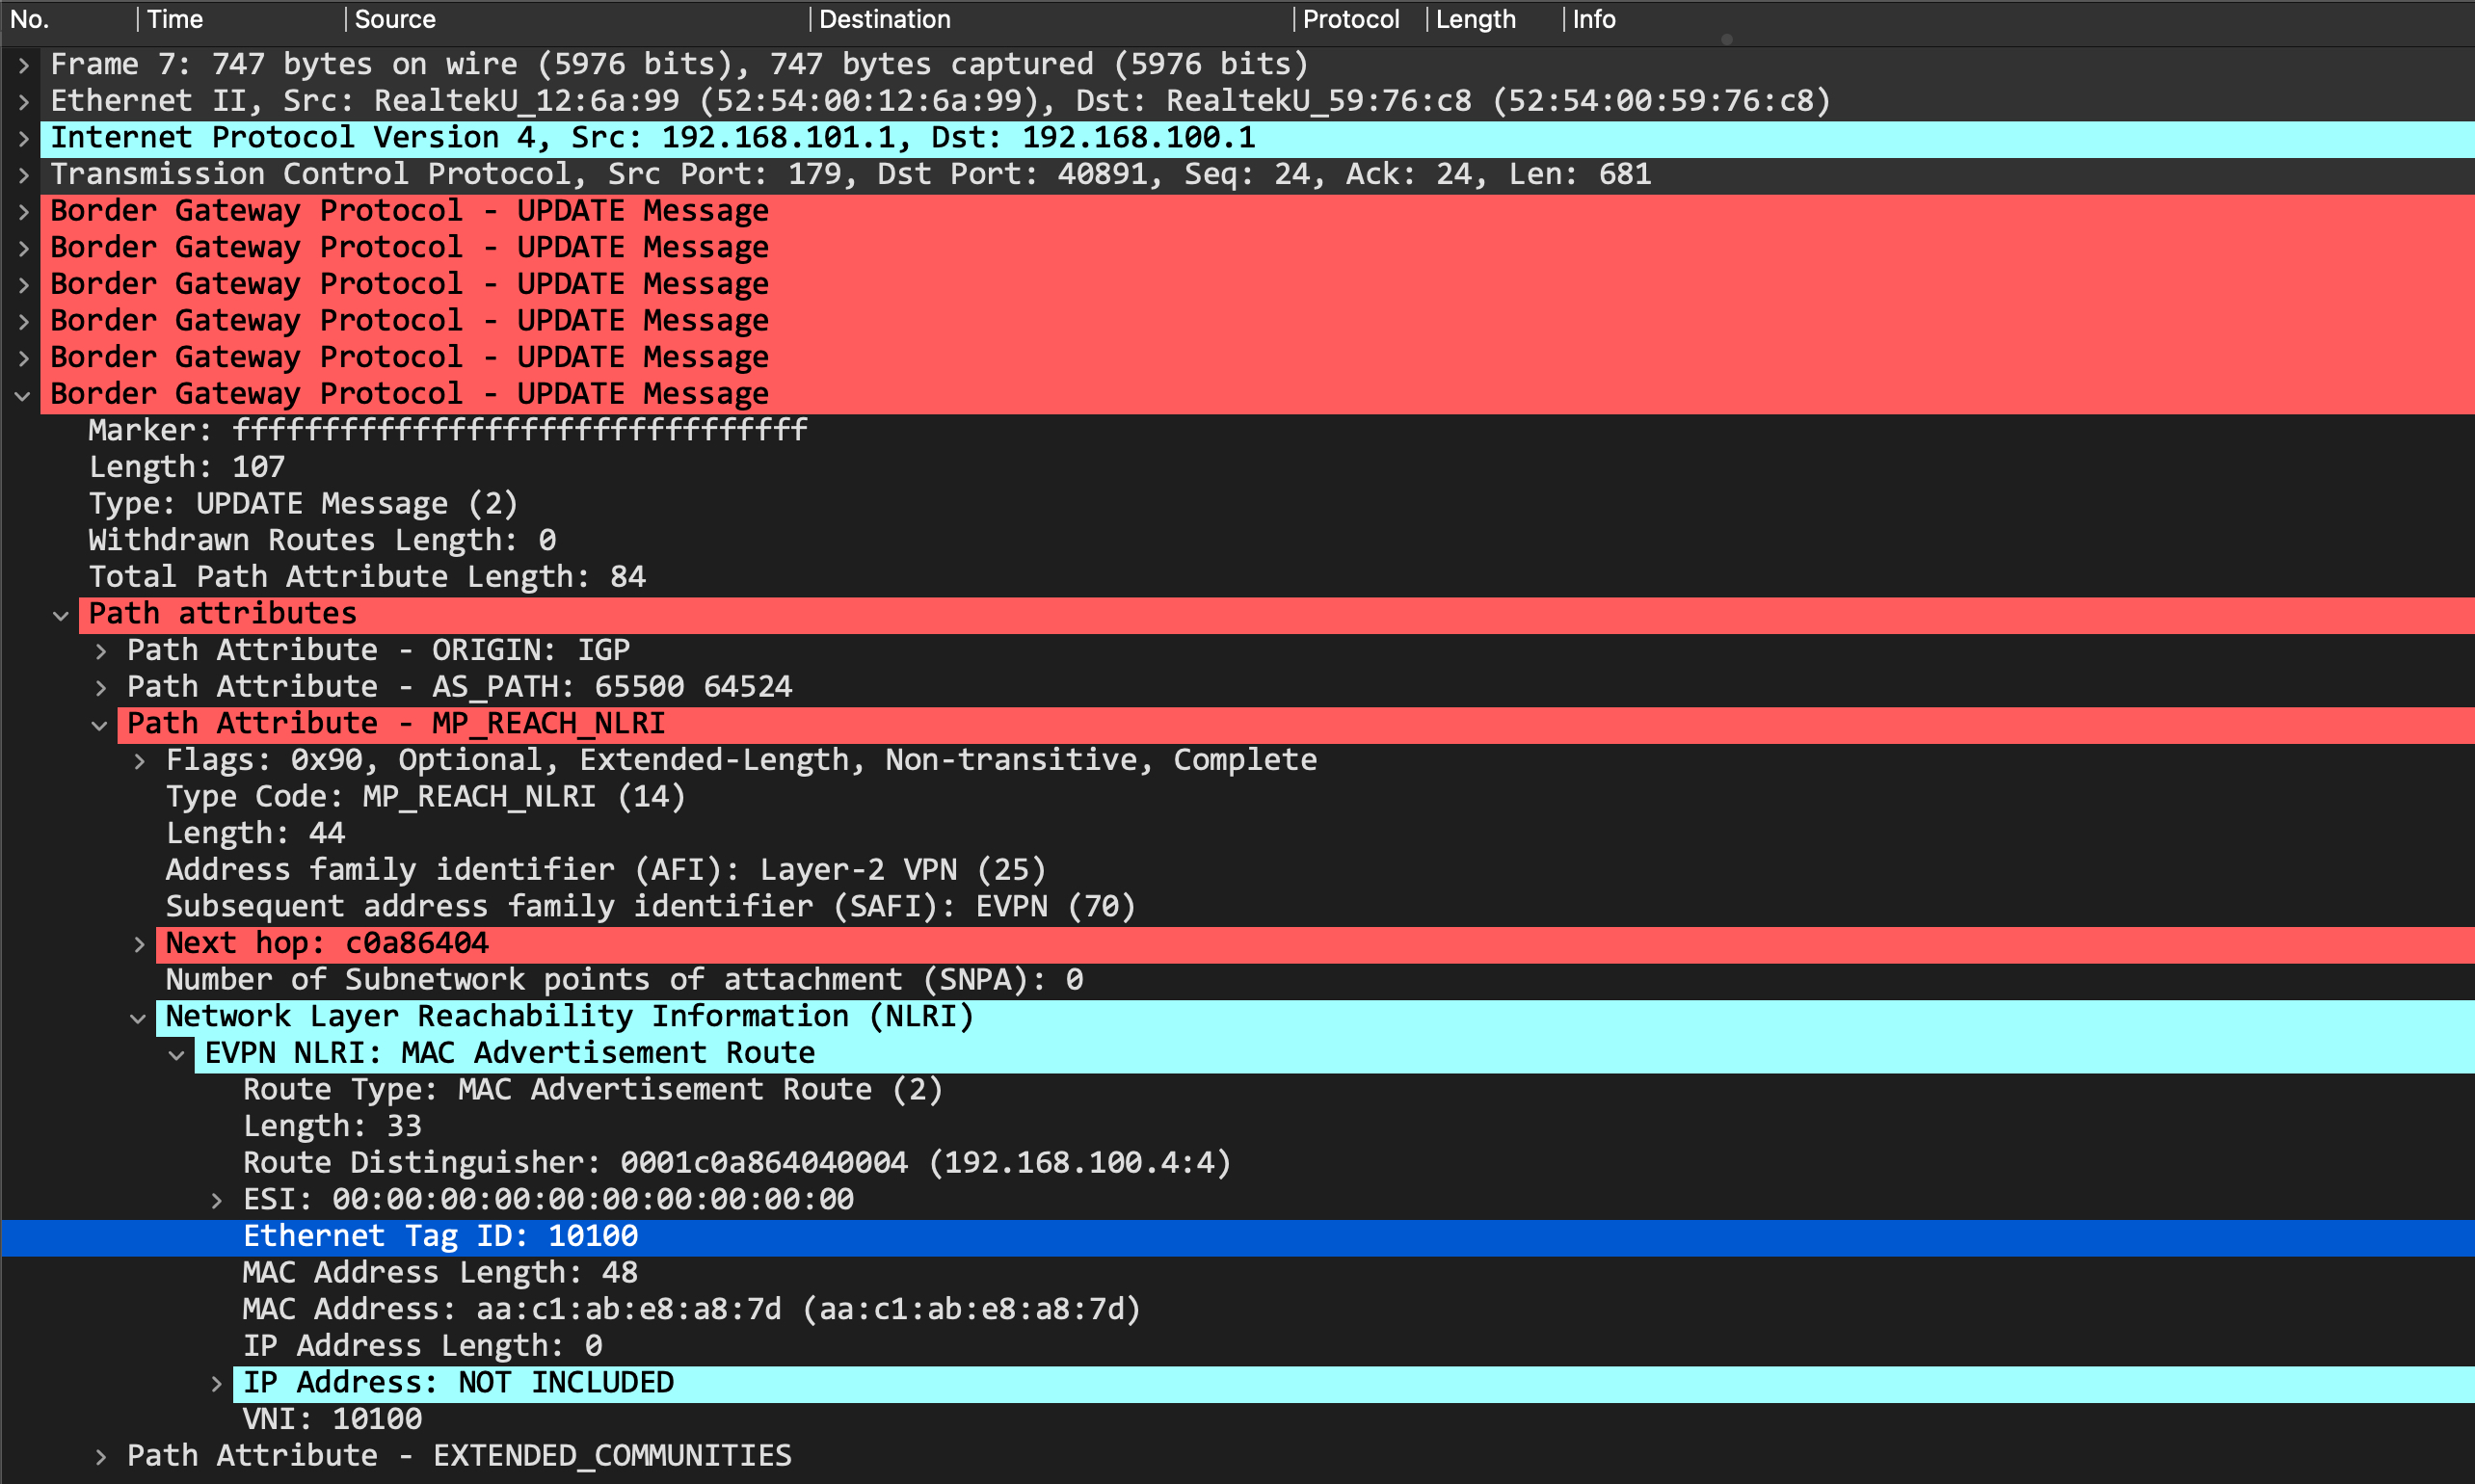
In both those cases, we see that the update is tagged with an Ethernet Tag ID of 10100, which corresponds to the VNI.
Remember that an Ethernet Tag ID essentially identifies a broadcast domain in an EVPN instance. However, there are multiple ways that such an instance can be represented. The most common ways are:
- VLAN based service
- VLAN bundle service
- VLAN-aware bundle service
By default, Juniper QFX (and vQFX) runs the VLAN-aware bundle service. This causes an Ethernet Tag ID to be set in the BGP EVPN updates. This is where the interoperability issues come in - my configuration on the Arista vEOS leaf is based on the VLAN based service type. EOS is built to drop updates with a non-zero Ethernet Tag ID when configured with VLAN based service type. This isn’t mandated in the RFC, so each vendor has its own implementation. In the same setup, Cumulus VX accepts it (it can only do VLAN based service type) and the N9Kv has a knob which allows it to accept non-zero Ethernet Tags (it can also only do VLAN based service type).
// leaf2 - Cumulus VX

root@6ff6c9ba2374bf95:mgmt:~# net show bridge macs | grep a8:7d
100       bridge  vni10100   aa:c1:ab:e8:a8:7d                            extern_learn        03:03:07
untagged          vni10100   aa:c1:ab:e8:a8:7d  192.168.100.4             self, extern_learn  03:03:07

// leaf3 - N9Kv

leaf3# show mac address-table
Legend:
        * - primary entry, G - Gateway MAC, (R) - Routed MAC, O - Overlay MAC
        age - seconds since last seen,+ - primary entry using vPC Peer-Link,
        (T) - True, (F) - False, C - ControlPlane MAC, ~ - vsan
   VLAN     MAC Address      Type      age     Secure NTFY Ports
---------+-----------------+--------+---------+------+----+------------------
*  100     aac1.ab48.5bcf   dynamic  0         F      F    Eth1/3
C  100     aac1.ab93.c413   dynamic  0         F      F    nve1(192.168.100.2)
C  100     aac1.abde.327e   dynamic  0         F      F    nve1(192.168.100.1)
C  100     aac1.abe8.a87d   dynamic  0         F      F    nve1(192.168.100.4)
G    -     5237.8000.1b08   static   -         F      F    sup-eth1(R)
As you can see, both these devices have accepted the routes, despite a non-zero Ethernet Tag ID.
Final thoughts and looking forward
Juniper QFX code was eventually enhanced to interoperate with different vendors and their behaviors - with a new routing-instance type of ‘mac-vrf’, you can now build any type of service you want.
If any of you actually deployed this in your labs, you’d see that h1 cannot ping h4:
root@h1:~# ping 10.100.100.4
PING 10.100.100.4 (10.100.100.4) 56(84) bytes of data.
From 10.100.100.1 icmp_seq=1 Destination Host Unreachable
From 10.100.100.1 icmp_seq=2 Destination Host Unreachable
From 10.100.100.1 icmp_seq=3 Destination Host Unreachable
Until… h4 pings h1, and then suddenly it starts working!
root@h4:~# ping 10.100.100.1
PING 10.100.100.1 (10.100.100.1) 56(84) bytes of data.
64 bytes from 10.100.100.1: icmp_seq=1 ttl=64 time=167 ms
64 bytes from 10.100.100.1: icmp_seq=2 ttl=64 time=104 ms
64 bytes from 10.100.100.1: icmp_seq=3 ttl=64 time=104 ms
^C
--- 10.100.100.1 ping statistics ---
3 packets transmitted, 3 received, 0% packet loss, time 5ms
rtt min/avg/max/mdev = 103.765/124.966/166.897/29.652 ms
Interesting, interesting. Any guesses why? We’ll look at this in detail in part2 of this EVPN multivendor deployment, so stay tuned!