Junos Part II - BGP and BGP Unnumbered
In this post, we look at BGP on Junos OS and a typical BGP configuration for the underlay, for a 3-stage Clos fabric. We also introduce BGP unnumbered, which is a great way of building the underlay, without the need of any IP addressing.
Introduction and topology
The goal of these introductory Junos posts is to get familiar with some basic configuration for commonly used protocols, since it may be a bit of a transition if you’re coming from the Cisco/Arista world. BGP is a big one, especially on the Data Center front - it is most often used as the underlay and overlay (for EVPN). To that end, it is extremely important to understand how to configure and process BGP on Junos OS.
We’re going to be working with the following topology for this post:
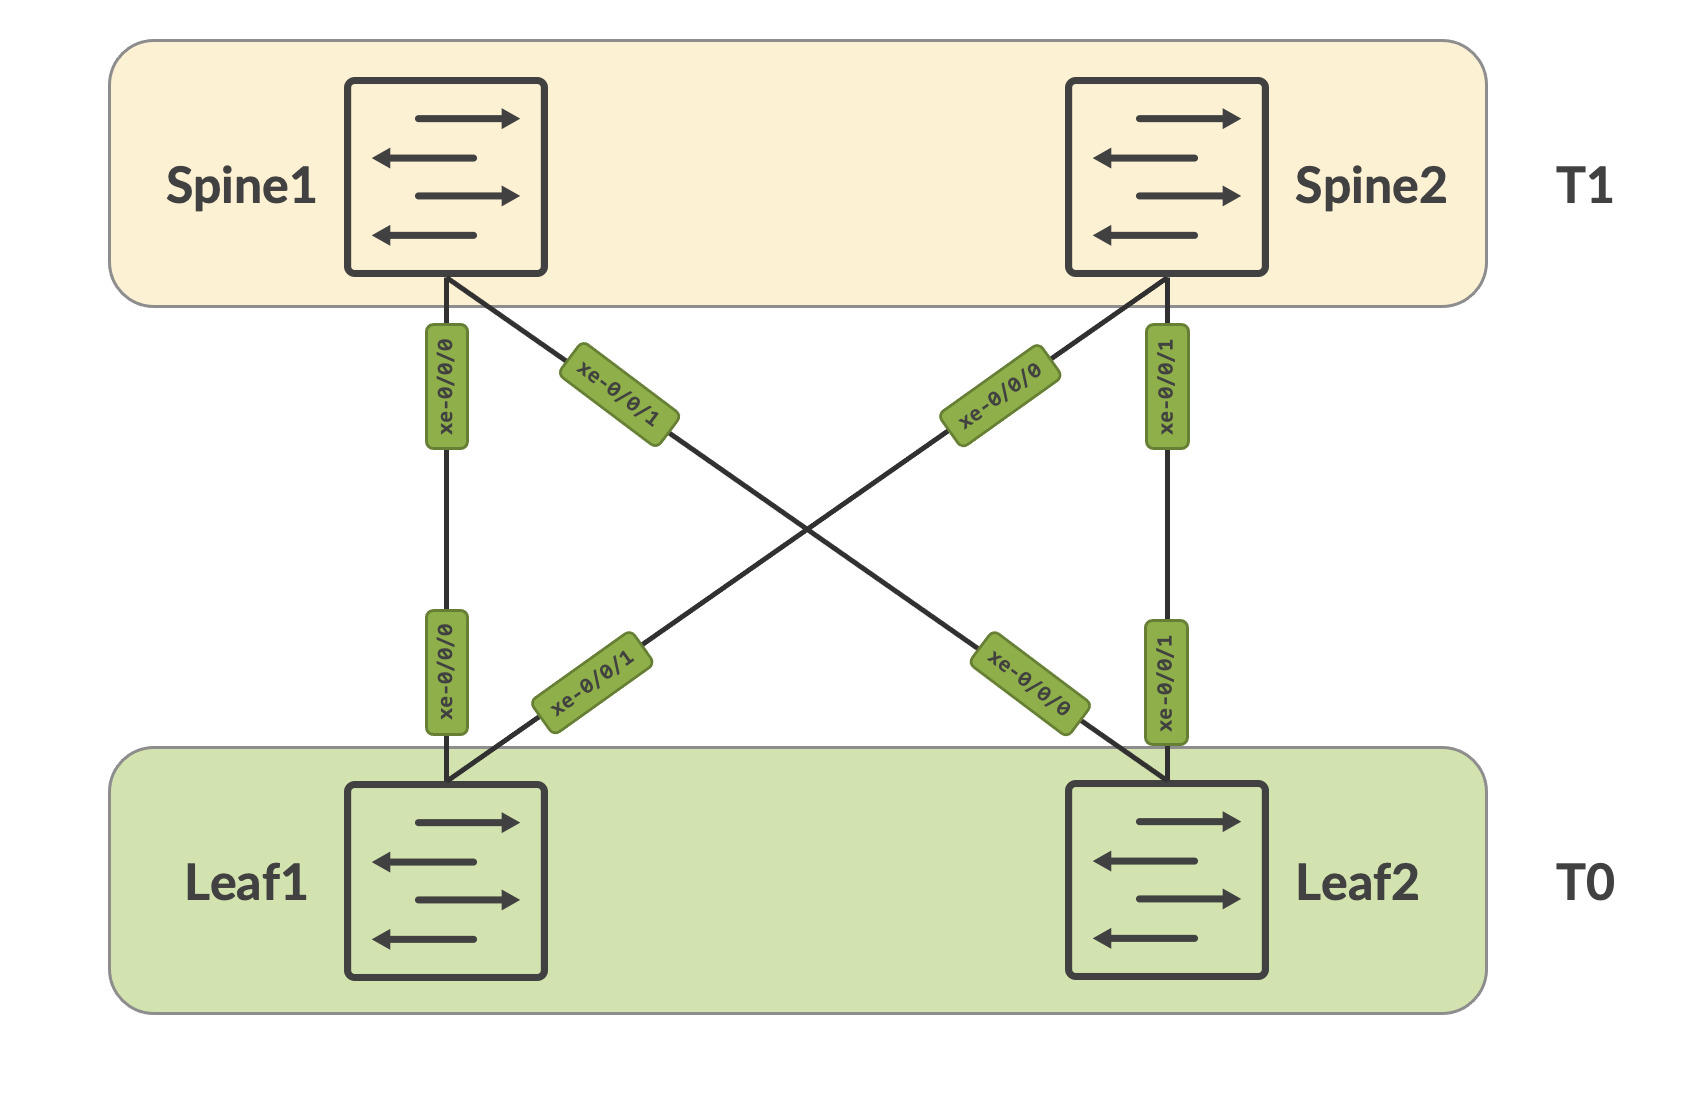
This is a typical 3-stage Clos design, with T0 being the leaf layer and T1 being the spine layer.
Breaking down a simple BGP configuration
BGP configuration is done in ‘groups’ - think of this as something similar to peer-groups in the Cisco world. I have a group called ‘underlay’ which defines two neighbors - 172.100.100.1 and 172.100.100.3, which are my p2p ends of the leaf links to the spines. I also have the peer AS number defined - since this is not specific to any neighbor, all neighbors inherit this peer AS and this does not have to be defined per neighbor.
root@Leaf1# show protocols bgp
group underlay {
    peer-as 65500;
    neighbor 172.100.100.1 {
        family inet {
            unicast;
        }
    }
    neighbor 172.100.100.3 {
        family inet {
            unicast;
        }
    }
}
Outside of this, we also have some common parameters defined under ‘routing-options’:
root@Leaf1# show routing-options
router-id 192.168.100.1;
autonomous-system 64521;
This is where we have our local AS number and the router ID defined. These can always be overridden under the BGP configuration, specific to a neighbor. However, if there is no configuration for this under BGP, these routing-option parameters are used. This allows for an easy way to declare the AS number and router ID (among other things) for your system globally, instead of having to specify this every time for every potential protocol that needs it.
Let’s look at the configuration from one of the spines as well:
root@Spine1# show protocols bgp
group underlay {
    neighbor 172.100.100.0 {
        family inet {
            unicast;
        }
        peer-as 64521;
    }
    neighbor 172.100.100.4 {
        family inet {
            unicast;
        }
        peer-as 64522;
    }
}
There’s not a whole lot that’s different here - the only thing is that we have the peer-as defined per neighbor, since each leaf is in its own AS. At this point, I have IPv4 unicast (or inet unicast peering in Juniper terminology) peering up between all the spines and the leafs.
// Spine1

root@Spine1# run show bgp summary
Threading mode: BGP I/O
Default eBGP mode: advertise - accept, receive - accept
Groups: 1 Peers: 2 Down peers: 0
Table          Tot Paths  Act Paths Suppressed    History Damp State    Pending
inet.0
                       0          0          0          0          0          0
Peer                     AS      InPkt     OutPkt    OutQ   Flaps Last Up/Dwn State|#Active/Received/Accepted/Damped...
172.100.100.0         64521        149        149       0       0     1:06:35 Establ
  inet.0: 0/0/0/0
172.100.100.4         64522        149        148       0       0     1:06:33 Establ
  inet.0: 0/0/0/0

// Spine2

root@Spine2# run show bgp summary
Threading mode: BGP I/O
Default eBGP mode: advertise - accept, receive - accept
Groups: 1 Peers: 2 Down peers: 0
Table          Tot Paths  Act Paths Suppressed    History Damp State    Pending
inet.0
                       0          0          0          0          0          0
Peer                     AS      InPkt     OutPkt    OutQ   Flaps Last Up/Dwn State|#Active/Received/Accepted/Damped...
172.100.100.2         64521        141        140       0       0     1:03:13 Establ
  inet.0: 0/0/0/0
172.100.100.6         64522        141        141       0       0     1:03:15 Establ
  inet.0: 0/0/0/0
Advertising prefixes into BGP
Coming from Cisco, I was hunting for the ‘network’ statement to advertise prefixes into BGP. This is done a little differently in Junos OS, so it’s important to cover this as well. Export policies are how you do this in Junos OS - you can have multiple export policies and this is evaluated from left to right. The first matching policy is applied.
Outside of this, the export policy can be applied at various levels of the hierarchy. The lower you go in the hierarchy, the more specific/explicit the policy is considered to be. The most specific/explicit policy always wins. For example, consider several export policies applied as below:
bgp {
    export policy_a;
    group underlay {
        export policy_b;
        neighbor x.x.x.x {
            export policy_c;
        }
    }
}
There are three policies in this case - policy_c is what is applied since that is the most specific policy.
If no export policy exists, BGP will advertise only the prefixes learned via BGP by default.
Let’s build a policy that advertises our loopbacks into BGP:
root@Leaf1# show policy-options
policy-statement allow_loopback0 {
    from {
        interface lo0.0;
        route-filter 192.168.100.1/32 exact;
    }
    then accept;
}
I’ve defined a policy-statement called ‘allow_loopback0’. In this, we match on interface lo0.0 and also specifically match the IP address 192.168.100.1/32 (as an exact match). We then add this as an export policy under BGP:
{master:0}[edit]
root@Leaf1# set protocols bgp group underlay export allow_loopback0
Now, Spine1 and Spine2 see this prefix from Leaf1. Taking Spine1 as an example:
root@Spine1# run show bgp summary
Threading mode: BGP I/O
Default eBGP mode: advertise - accept, receive - accept
Groups: 1 Peers: 2 Down peers: 0
Table          Tot Paths  Act Paths Suppressed    History Damp State    Pending
inet.0
                       1          1          0          0          0          0
Peer                     AS      InPkt     OutPkt    OutQ   Flaps Last Up/Dwn State|#Active/Received/Accepted/Damped...
172.100.100.0         64521        202        201       0       0     1:29:51 Establ
  inet.0: 1/1/1/0
172.100.100.4         64522        201        201       0       0     1:29:49 Establ
  inet.0: 0/0/0/0

root@Spine1# run show route receive-protocol bgp 172.100.100.0

inet.0: 7 destinations, 7 routes (7 active, 0 holddown, 0 hidden)
  Prefix                  Nexthop              MED     Lclpref    AS path
* 192.168.100.1/32        172.100.100.0                           64521 I

inet6.0: 2 destinations, 2 routes (2 active, 0 holddown, 0 hidden)

root@Spine1# run show route protocol bgp

inet.0: 7 destinations, 7 routes (7 active, 0 holddown, 0 hidden)
+ = Active Route, - = Last Active, * = Both

192.168.100.1/32   *[BGP/170] 00:01:19, localpref 100
                      AS path: 64521 I, validation-state: unverified
                    >  to 172.100.100.0 via xe-0/0/0.0

inet6.0: 2 destinations, 2 routes (2 active, 0 holddown, 0 hidden)
We do the same thing on Leaf2 as well:
root@Leaf2# show policy-options
policy-statement allow_loopback0 {
    from {
        interface lo0.0;
        route-filter 192.168.100.2/32 exact;
    }
    then accept;
}
The command ‘show route receive-protocol bgp’ shows the routes received by the BGP process from a specific neighbor. This is essentially BGP RIB In.
At this point, both Leaf1 and Leaf2 should have each others loopback, and it should be reachable.
// Leaf1

root@Leaf1# run show route protocol bgp

inet.0: 8 destinations, 9 routes (8 active, 0 holddown, 0 hidden)
+ = Active Route, - = Last Active, * = Both

192.168.100.2/32   *[BGP/170] 00:00:54, localpref 100
                      AS path: 65500 64522 I, validation-state: unverified
                    >  to 172.100.100.1 via xe-0/0/0.0
                    [BGP/170] 00:00:54, localpref 100
                      AS path: 65500 64522 I, validation-state: unverified
                    >  to 172.100.100.3 via xe-0/0/1.0

inet6.0: 2 destinations, 2 routes (2 active, 0 holddown, 0 hidden)

// Leaf2

root@Leaf2# run show route protocol bgp

inet.0: 8 destinations, 9 routes (8 active, 0 holddown, 0 hidden)
+ = Active Route, - = Last Active, * = Both

192.168.100.1/32   *[BGP/170] 00:03:38, localpref 100
                      AS path: 65500 64521 I, validation-state: unverified
                    >  to 172.100.100.5 via xe-0/0/0.0
                    [BGP/170] 00:03:38, localpref 100
                      AS path: 65500 64521 I, validation-state: unverified
                    >  to 172.100.100.7 via xe-0/0/1.0

inet6.0: 2 destinations, 2 routes (2 active, 0 holddown, 0 hidden)

root@Leaf1# run ping 192.168.100.2 source 192.168.100.1
PING 192.168.100.2 (192.168.100.2): 56 data bytes
64 bytes from 192.168.100.2: icmp_seq=0 ttl=63 time=237.986 ms
64 bytes from 192.168.100.2: icmp_seq=1 ttl=63 time=216.589 ms
64 bytes from 192.168.100.2: icmp_seq=2 ttl=63 time=126.104 ms
64 bytes from 192.168.100.2: icmp_seq=3 ttl=63 time=124.349 ms
64 bytes from 192.168.100.2: icmp_seq=4 ttl=63 time=122.077 ms
64 bytes from 192.168.100.2: icmp_seq=5 ttl=63 time=123.286 ms
64 bytes from 192.168.100.2: icmp_seq=6 ttl=63 time=123.885 ms
^C
--- 192.168.100.2 ping statistics ---
7 packets transmitted, 7 packets received, 0% packet loss
round-trip min/avg/max/stddev = 122.077/153.468/237.986/47.050 ms
A note on load-balancing
By default, BGP does not load-balance over multiple paths. This must be explicitly enabled, and this is no different on Junos OS as well. This can be done using the ‘multipath’ option:
root@Leaf1# set protocols bgp group underlay multipath
However, even after this, the forwarding-table maintained by the Routing Engine (the RE maintains a master copy, and this is sent to the PFE which eventually installs it in the ASICs) does not show ECMP for these loopbacks:
// Leaf1

root@Leaf1# run show route forwarding-table destination 192.168.100.2/32
Routing table: default.inet
Internet:
Destination        Type RtRef Next hop           Type Index    NhRef Netif
192.168.100.2/32   user     0 172.100.100.3      ucst     1735     4 xe-0/0/1.0

// Leaf2

root@Leaf2# run show route forwarding-table destination 192.168.100.1/32
Routing table: default.inet
Internet:
Destination        Type RtRef Next hop           Type Index    NhRef Netif
192.168.100.1/32   user     0 172.100.100.7      ucst     1735     4 xe-0/0/1.0
This is where a second export policy comes in - this time the export is from the routing table in the RE to the forwarding table in the RE, and the export is applied against the forwarding table itself. The policy looks like this:
root@Leaf1# show policy-options
policy-statement ECMP {
    then {
        load-balance per-flow;
    }
}
It says match anything, and allow for a per-flow load balancing.
In previous versions, the parameter ‘per-flow’ did not exists and the only option was ‘per-packet’. This was confusing because ‘per-packet’ would also really do ‘per-flow’ load balancing. So, in summary, regardless of what you choose, you’re really doing per-flow load balancing. The ‘per-packet’ option will be deprecated in future releases.
Finally, this policy is applied as follows:
root@Leaf1# set routing-options forwarding-table export ECMP
Now you can see two next hops in the forwarding table as well:
root@Leaf1# run show route forwarding-table destination 192.168.100.2/32
Routing table: default.inet
Internet:
Destination        Type RtRef Next hop           Type Index    NhRef Netif
192.168.100.2/32   user     0                    ulst   131070     2
                              172.100.100.1      ucst     1734     4 xe-0/0/0.0
                              172.100.100.3      ucst     1735     4 xe-0/0/1.0
This covers an eBGP underlay design and configuration. Our goal was to simply provide reachability from leaf loopbacks, which will eventually be used as the VTEP source interfaces, and next hops for the EVPN overlay (more on that in a later post).
BGP Unnumbered (BGP auto discovered neighbors)
Why BGP unnumbered
I’ve covered BGP Unnumbered in one of my earlier Cumulus posts. This one is going to be specific to Junos OS - the methodology is largely the same, so for the most part, this section will help you understand the Junos OS configuration better and what it is doing.
Juniper calls this BGP Auto Discovered Neighbors
BGP unnumbered is gaining popularity (as it should) as the primary choice for underlay design in a VXLAN EVPN fabric. The reason is fairly simple - a big part of designing your underlay is IPv4 address allocation (assuming you’re building an IPv4 underlay). These are typically /30s (that should really be /31s). BGP unnumbered alleviates the pain of this address allocation, and simply functions on the fact that an IPv6 peering can be used to advertise an IPv4 NLRI with an IPv6 next-hop (RFC 5549).
IPv6 configuration for BGP unnumbered
Assuming we start fresh, there’s no IPv4 address assigned to any of the p2p links between the leafs and spines. The first thing we need to do is enable IPv6 and IPv6 Router Advertisements on our p2p links - this allows for a link local inet6 address to be assigned to the interface, and advertised via RA. Note, you must enable the inet family as well.
Let’s take the connection between Leaf1 and Spine1 to understand this better.
// Leaf1

root@Leaf1# show interfaces xe-0/0/0
unit 0 {
    family inet;
    family inet6;
}

root@Leaf1# show protocols router-advertisement
interface xe-0/0/0.0;

// Spine1

root@Spine1# show interfaces xe-0/0/0
unit 0 {
    family inet;
    family inet6;
}

root@Spine1# show protocols router-advertisement
interface xe-0/0/0.0;
Enabling inet6 family under the interface should assign a link local inet6 address to these interfaces:
// Leaf1

root@Leaf1# run show interfaces xe-0/0/0.0
  Logical interface xe-0/0/0.0 (Index 555) (SNMP ifIndex 526)
    Flags: Up SNMP-Traps 0x4004000 Encapsulation: ENET2
    Input packets : 113
    Output packets: 119
    Protocol inet6, MTU: 1500
    Max nh cache: 75000, New hold nh limit: 75000, Curr nh cnt: 1, Curr new hold cnt: 0, NH drop cnt: 0
      Flags: Is-Primary
      Addresses, Flags: Is-Preferred
        Destination: fe80::/64, Local: fe80::205:86ff:fefd:4203

// Spine1

root@Spine1# run show interfaces xe-0/0/0.0
  Logical interface xe-0/0/0.0 (Index 555) (SNMP ifIndex 527)
    Flags: Up SNMP-Traps 0x4004000 Encapsulation: ENET2
    Input packets : 118
    Output packets: 122
    Protocol inet6, MTU: 1500
    Max nh cache: 75000, New hold nh limit: 75000, Curr nh cnt: 1, Curr new hold cnt: 0, NH drop cnt: 0
      Flags: Is-Primary
      Addresses, Flags: Is-Preferred
        Destination: fe80::/64, Local: fe80::205:86ff:fe3d:f503
Outside of this, both Leaf1 and Spine1 should now be sending RAs as well, advertisting their link local inet6 address. Through this, they should also learn each others link local addresses. A packet capture shows these RAs sent out:
From the CLI, we should see our peers link local address as well:
// Leaf1

root@Leaf1# run show ipv6 router-advertisement
Interface: xe-0/0/0.0
  Advertisements sent: 7, last sent 00:03:02 ago
  Solicits sent: 1, last sent 00:24:35 ago
  Solicits received: 1, last received 00:24:03 ago
  Advertisements received: 7
  Solicited router advertisement unicast: Disable
  IPv6 RA Preference: DEFAULT/MEDIUM
  Advertisement from fe80::205:86ff:fe3d:f503, heard 00:01:04 ago
    Managed: 0
    Other configuration: 0
    Reachable time: 0 ms
    Default lifetime: 1800 sec
    Retransmit timer: 0 ms
    Current hop limit: 64

root@Leaf1# run show ipv6 neighbors
IPv6 Address                            Linklayer Address  State       Exp   Rtr  Secure  Interface
fe80::205:86ff:fe3d:f503                 02:05:86:3d:f5:03  stale       852   yes  no      xe-0/0/0.0

// Spine1

root@Spine1# run show ipv6 router-advertisement
Interface: xe-0/0/0.0
  Advertisements sent: 7, last sent 00:01:30 ago
  Solicits sent: 1, last sent 00:24:29 ago
  Solicits received: 0
  Advertisements received: 4
  Solicited router advertisement unicast: Disable
  IPv6 RA Preference: DEFAULT/MEDIUM
  Advertisement from fe80::205:86ff:fefd:4203, heard 00:03:28 ago
    Managed: 0
    Other configuration: 0
    Reachable time: 0 ms
    Default lifetime: 1800 sec
    Retransmit timer: 0 ms
    Current hop limit: 64

root@Spine1# run show ipv6 neighbors
IPv6 Address                            Linklayer Address  State       Exp   Rtr  Secure  Interface
fe80::205:86ff:fefd:4203                 02:05:86:fd:42:03  stale       773   yes  no      xe-0/0/0.0
We’ll complete our configuration by applying the same commands to all other relevant devices and interfaces. At the end of this, the two spines have learned the link local addresses of both leafs:
// Spine1

root@Spine1# run show ipv6 neighbors
IPv6 Address                            Linklayer Address  State       Exp   Rtr  Secure  Interface
fe80::205:86ff:fea8:a803                 02:05:86:a8:a8:03  reachable   11    yes  no      xe-0/0/1.0
fe80::205:86ff:fefd:4203                 02:05:86:fd:42:03  reachable   4     yes  no      xe-0/0/0.0
Total entries: 2

// Spine2

root@Spine2# run show ipv6 neighbors
IPv6 Address                            Linklayer Address  State       Exp   Rtr  Secure  Interface
fe80::205:86ff:fea8:a807                 02:05:86:a8:a8:07  reachable   27    yes  no      xe-0/0/1.0
fe80::205:86ff:fefd:4207                 02:05:86:fd:42:07  reachable   10    yes  no      xe-0/0/0.0
Total entries: 2
Enabling BGP to auto discover IPv6 neighbors
Now that we have our base IPv6 configuration deployed, we can start to enable BGP for the underlay. But there’s a catch here - since we’re no longer using IPv4 addressing for our underlay, what do we really peer against? BGP needs an explicit neighbor address to peer with. This is where we leverage BGP dynamic peering to build neighbors over these IPv6 link local addresses, using IPv6 Neighbor Discovery.
Consider Leaf1 and Spine1 again to understand this better. We’re going to create a BGP ‘underlay’ group again, but this time, instead of specifying IPv4 neighbors, we’re going to enable BGP peer discovery and enable it for the IPv6 enabled interfaces (you’re specifying interfaces for peering instead of neighbor addresses now).
This is what we have so far for this part of the configuration:
root@Leaf1# show | compare
[edit protocols]
+   bgp {
+       group underlay {
+           dynamic-neighbor bgp_unnumbered {
+               peer-auto-discovery {
+                   family inet6 {
+                       ipv6-nd;
+                   }
+                   interface xe-0/0/0.0;
+               }
+           }
+       }
+   }
Outside of this, we also need to enable this group for both inet and inet6. The inet family must allow for Extended Next Hop, since the next-hop is going to be an IPv6 address. Also, since all our spines are in the same AS, we can define the peer-as for the entire ‘underlay’ group.
Extended Next Hop is a new capability that was introduced as part of RFC 5549. This is what allows an IPv4 NLRI to be advertised using an IPv6 next hop.
Our final configuration looks like this:
root@Leaf1# show | compare
[edit protocols]
+   bgp {
+       group underlay {
+           family inet {
+               unicast {
+                   extended-nexthop;
+               }
+           }
+           family inet6 {
+               unicast;
+           }
+           peer-as 65500;
+           multipath;
+           dynamic-neighbor bgp_unnumbered {
+               peer-auto-discovery {
+                   family inet6 {
+                       ipv6-nd;
+                   }
+                   interface xe-0/0/0.0;
+               }
+           }
+       }
+   }
Once we commit this on Leaf1, it picks up Spine1s link local IPv6 address from ND (Neighbor Discovery) and builds a dynamic peering against it:
root@Leaf1# run show bgp summary
Threading mode: BGP I/O
Default eBGP mode: advertise - accept, receive - accept
Groups: 1 Peers: 1 Down peers: 1
Auto-discovered peers: 1
Table          Tot Paths  Act Paths Suppressed    History Damp State    Pending
inet.0
                       0          0          0          0          0          0
inet6.0
                       0          0          0          0          0          0
Peer                     AS      InPkt     OutPkt    OutQ   Flaps Last Up/Dwn State|#Active/Received/Accepted/Damped...
fe80::205:86ff:fe3d:f503%xe-0/0/0.0       65500          0          0       0       0        2:05 Active
The session remains active because Spine1 is not yet configured and any TCP request on port 179 is rejected by it, with a TCP RST sent back:
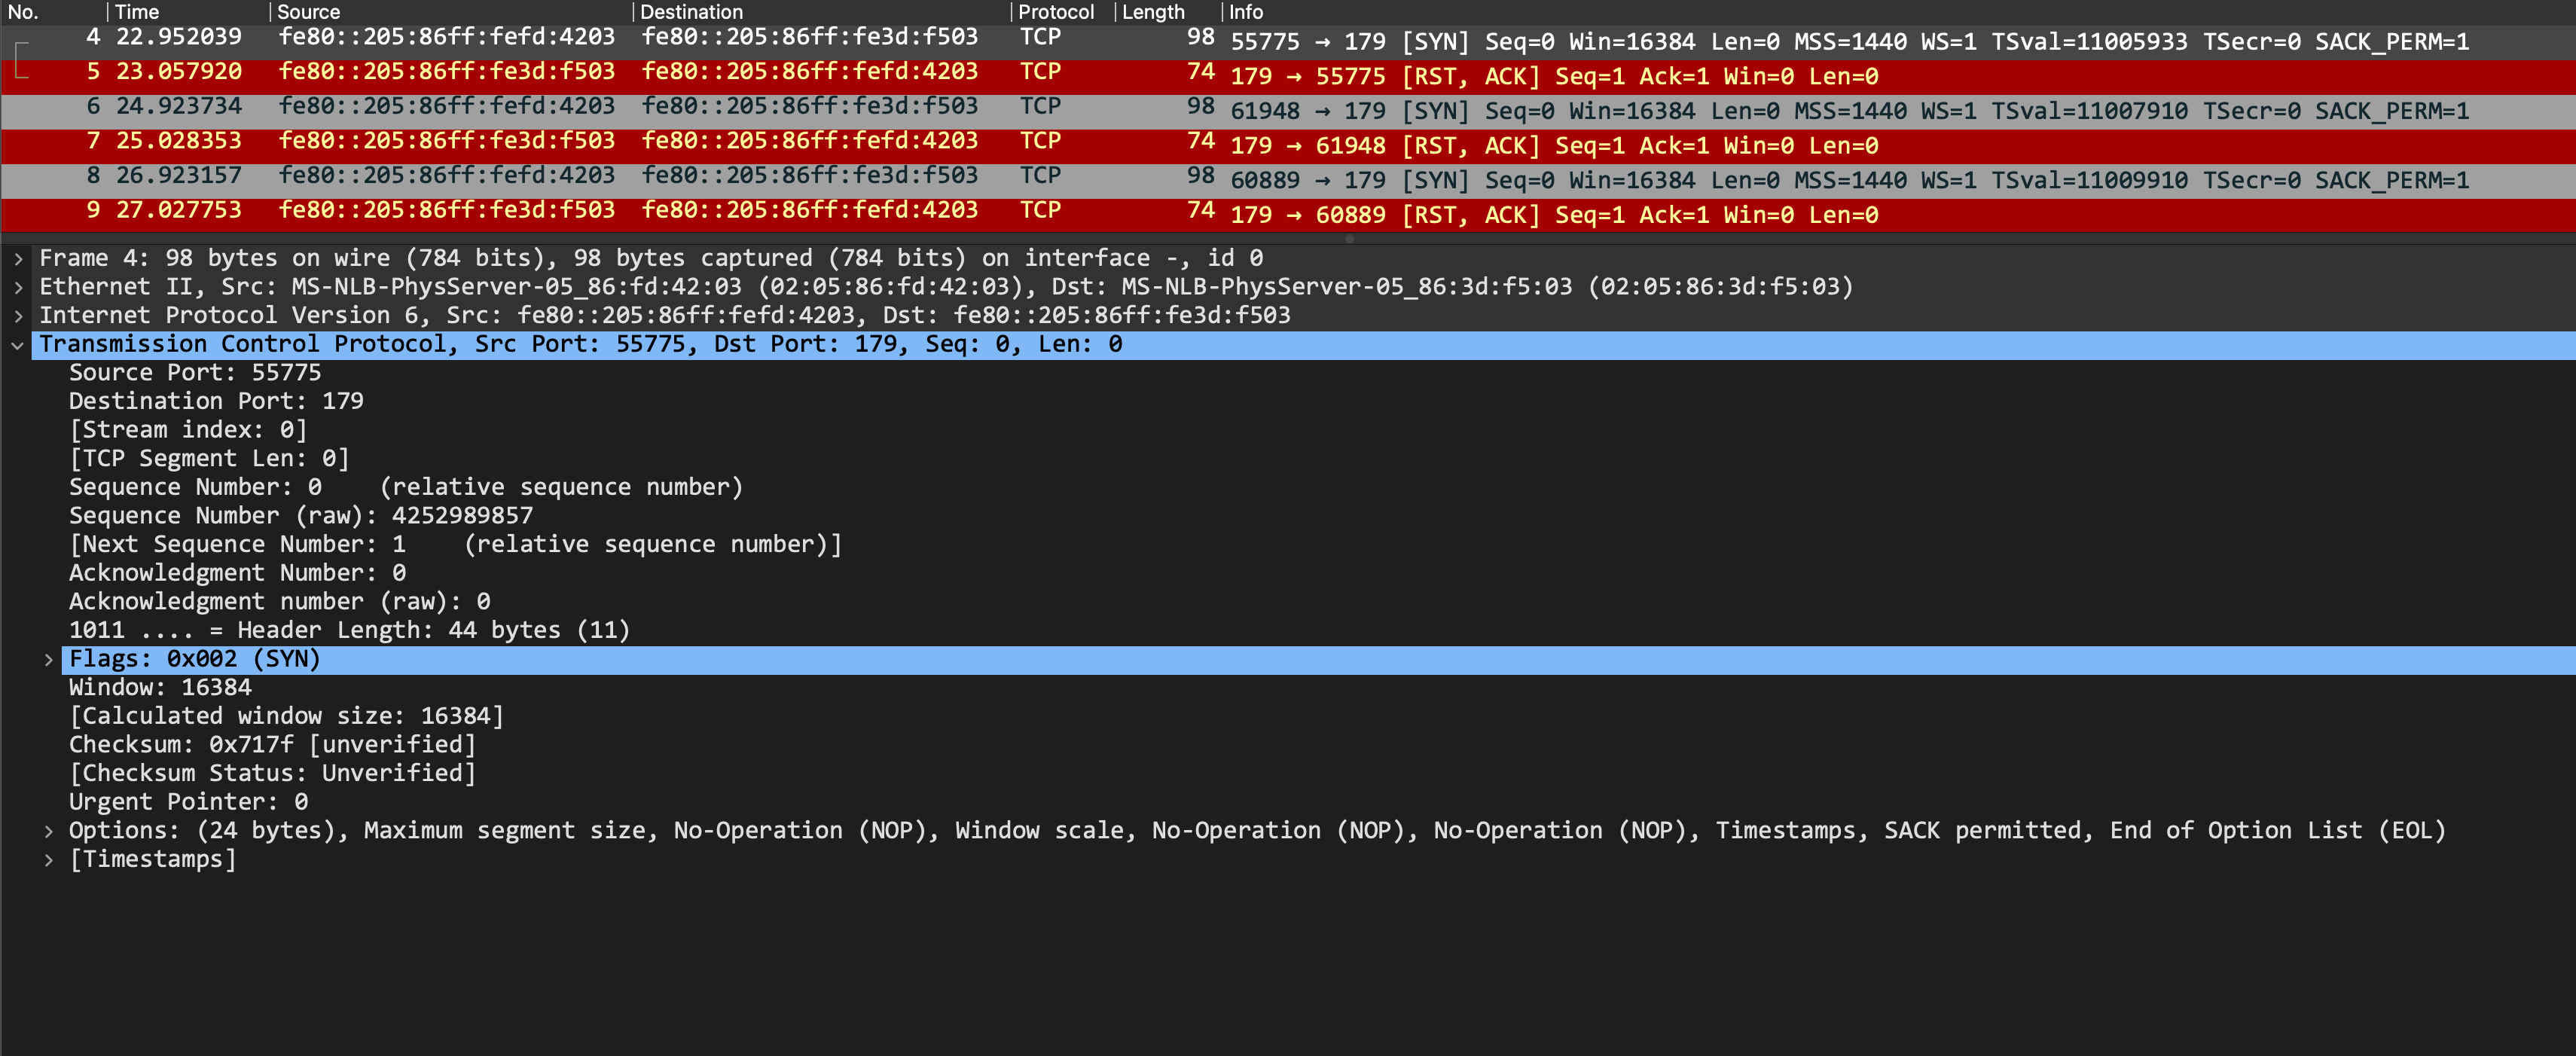
Junos OS does not allow you to specify a peers BGP AS number against an interface. Because of this, our spine configuration is going to have an addition - since the leafs are in their own unique autonomous systems, we can’t just have one peer-as for the entire underlay group. Thus, we configure a ‘peer-list’ instead and apply this under the BGP group.
This is done via a type of policy-option called ‘as-list’, which allows you to specify a range of BGP AS numbers. The final configuration on Spine1 is:
root@Spine1# show | compare
[edit]
+  policy-options {
+      as-list bgp_unnumbered_as_list members 64521-64530;
+  }
[edit protocols]
+   bgp {
+       group underlay {
+           family inet {
+               unicast {
+                   extended-nexthop;
+               }
+           }
+           family inet6 {
+               unicast;
+           }
+           multipath;
+           dynamic-neighbor bgp_unnumbered {
+               peer-auto-discovery {
+                   family inet6 {
+                       ipv6-nd;
+                   }
+                   interface xe-0/0/0.0;
+               }
+           }
+           peer-as-list bgp_unnumbered_as_list;
+       }
+   }
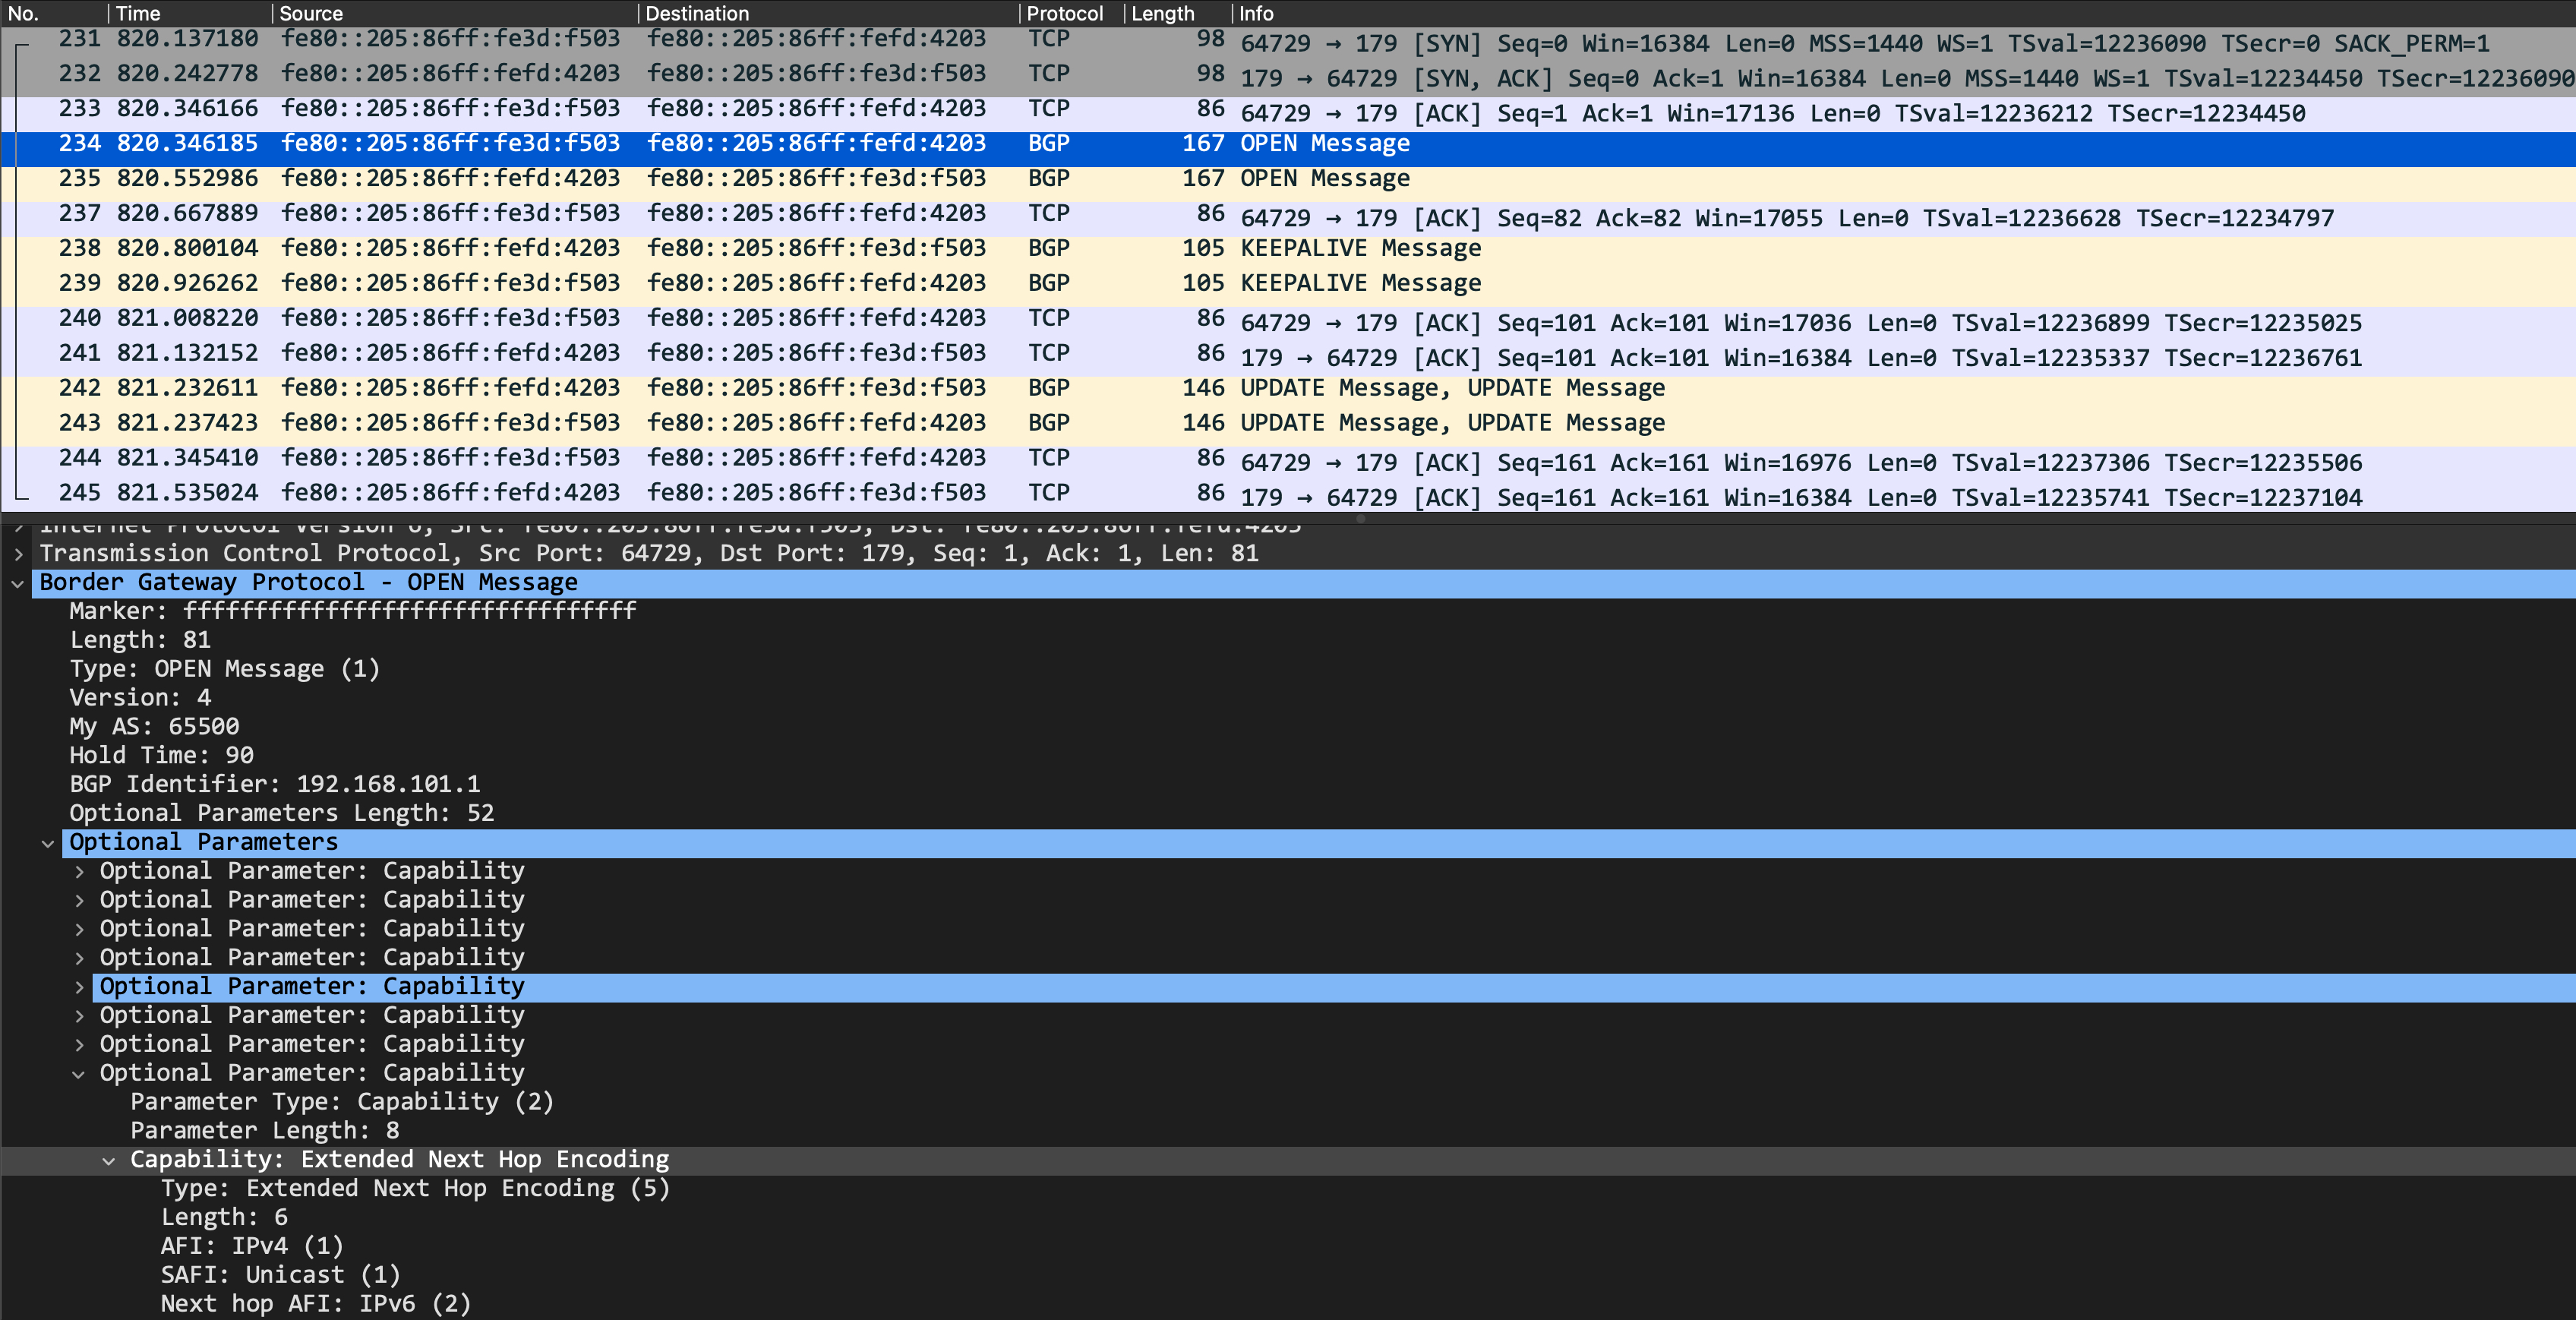
Let’s commit this now and take a packet capture to look at the BGP peering bringup. From this packet capture we can see that things look much better now - a TCP 3-way handshake successfully completed, and each peer is sending a BGP OPEN message. It’s important to confirm that this new Extended Next Hop capability is exchanged during BGP OPEN, as we can see below:
We also see our peering in an Established state now:
root@Leaf1# run show bgp summary
Threading mode: BGP I/O
Default eBGP mode: advertise - accept, receive - accept
Groups: 1 Peers: 1 Down peers: 0
Auto-discovered peers: 1
Table          Tot Paths  Act Paths Suppressed    History Damp State    Pending
inet.0
                       0          0          0          0          0          0
inet6.0
                       0          0          0          0          0          0
Peer                     AS      InPkt     OutPkt    OutQ   Flaps Last Up/Dwn State|#Active/Received/Accepted/Damped...
fe80::205:86ff:fe3d:f503%xe-0/0/0.0       65500         18         17       0       0        6:38 Establ
  inet.0: 0/0/0/0
  inet6.0: 0/0/0/0
Similar configuration can be done for all leafs and spines and their respective interfaces now. At the end of it, both the spines see the leafs as BGP peers:
// Spine1

root@Spine1# run show bgp summary
Threading mode: BGP I/O
Default eBGP mode: advertise - accept, receive - accept
Groups: 1 Peers: 2 Down peers: 0
Auto-discovered peers: 2
Table          Tot Paths  Act Paths Suppressed    History Damp State    Pending
inet.0
                       0          0          0          0          0          0
inet6.0
                       0          0          0          0          0          0
Peer                     AS      InPkt     OutPkt    OutQ   Flaps Last Up/Dwn State|#Active/Received/Accepted/Damped...
fe80::205:86ff:fea8:a803%xe-0/0/1.0       64522         15         15       0       0        5:45 Establ
  inet.0: 0/0/0/0
  inet6.0: 0/0/0/0
fe80::205:86ff:fefd:4203%xe-0/0/0.0       64521         41         41       0       0       17:07 Establ
  inet.0: 0/0/0/0
  inet6.0: 0/0/0/0

// Spine2

root@Spine2# run show bgp summary
Threading mode: BGP I/O
Default eBGP mode: advertise - accept, receive - accept
Groups: 1 Peers: 2 Down peers: 0
Auto-discovered peers: 2
Table          Tot Paths  Act Paths Suppressed    History Damp State    Pending
inet.0
                       0          0          0          0          0          0
inet6.0
                       0          0          0          0          0          0
Peer                     AS      InPkt     OutPkt    OutQ   Flaps Last Up/Dwn State|#Active/Received/Accepted/Damped...
fe80::205:86ff:fea8:a807%xe-0/0/1.0       64522         15         14       0       0        5:04 Establ
  inet.0: 0/0/0/0
  inet6.0: 0/0/0/0
fe80::205:86ff:fefd:4207%xe-0/0/0.0       64521         14         13       0       0        5:03 Establ
  inet.0: 0/0/0/0
  inet6.0: 0/0/0/0
If you want to see just the auto discovered peers and nothing else, you can use the ‘show bgp summary auto-discovered’ CLI instead
Analyzing an IPv4 NLRI advertisement with BGP unnumbered
Again, with dynamic neighbors using IPv6 ND, Junos OS does not allow you to apply an export policy against the interface (and since you don’t have explicit neighbors, you can’t apply it there either). In this case, we need to apply it for the entire group, which is why it is important to keep your policy as specific as possible:
policy-statement allow_loopback0 {
    from {
        interface lo0.0;
        route-filter 192.168.100.1/32 exact;
    }
    then accept;
}
This can now be exported under the BGP group ‘underlay’:
root@Leaf1# set protocols bgp group underlay export allow_loopback0
In some vQFX versions, you might see your BGP peering flap when an export policy is applied (which is quite disruptive, naturally). Rest assured, this does not happen on actual physical hardware.
Once this is done, you should see the spines receiveing this prefix, with an IPv6 next hop:
// Spine1

root@Spine1# run show route receive-protocol bgp fe80::205:86ff:fefd:4203%xe-0/0/0.0

inet.0: 3 destinations, 3 routes (3 active, 0 holddown, 0 hidden)
  Prefix                  Nexthop              MED     Lclpref    AS path
* 192.168.100.1/32        fe80::205:86ff:fefd:4203                64521 I

inet6.0: 4 destinations, 4 routes (4 active, 0 holddown, 0 hidden)

// Spine2

root@Spine2# run show route receive-protocol bgp fe80::205:86ff:fefd:4207%xe-0/0/0.0

inet.0: 3 destinations, 3 routes (3 active, 0 holddown, 0 hidden)
  Prefix                  Nexthop              MED     Lclpref    AS path
* 192.168.100.1/32        fe80::205:86ff:fefd:4207                64521 I

inet6.0: 4 destinations, 4 routes (4 active, 0 holddown, 0 hidden)
On Leaf2, this should now be a multipath prefix, load-balanced over both the links to the spines:
root@Leaf2# run show route 192.168.100.1/32

inet.0: 4 destinations, 5 routes (4 active, 0 holddown, 0 hidden)
+ = Active Route, - = Last Active, * = Both

192.168.100.1/32   *[BGP/170] 00:40:26, localpref 100, from fe80::205:86ff:fe3d:f507
                      AS path: 65500 64521 I, validation-state: unverified
                       to fe80::205:86ff:fe3d:f507 via xe-0/0/0.0
                    >  to fe80::205:86ff:fe85:5a07 via xe-0/0/1.0
                    [BGP/170] 02:00:34, localpref 100
                      AS path: 65500 64521 I, validation-state: unverified
                    >  to fe80::205:86ff:fe85:5a07 via xe-0/0/1.0

root@Leaf2# run show route forwarding-table destination 192.168.100.1/32
Routing table: default.inet
Internet:
Destination        Type RtRef Next hop           Type Index    NhRef Netif
192.168.100.1/32   user     0                    ulst   131070     2
                              fe80::205:86ff:fe3d:f507
                                                 ucst     1741     5 xe-0/0/0.0
                              fe80::205:86ff:fe85:5a07
                                                 ucst     1738     5 xe-0/0/1.0
As a final confirmation, Leaf1 should be able to ping Leaf2s loopback just like before:
root@Leaf1# run ping 192.168.100.2 source 192.168.100.1
PING 192.168.100.2 (192.168.100.2): 56 data bytes
64 bytes from 192.168.100.2: icmp_seq=0 ttl=63 time=168.321 ms
64 bytes from 192.168.100.2: icmp_seq=1 ttl=63 time=168.718 ms
64 bytes from 192.168.100.2: icmp_seq=2 ttl=63 time=147.416 ms
64 bytes from 192.168.100.2: icmp_seq=3 ttl=63 time=300.588 ms
64 bytes from 192.168.100.2: icmp_seq=4 ttl=63 time=144.453 ms
64 bytes from 192.168.100.2: icmp_seq=5 ttl=63 time=135.477 ms
^C
--- 192.168.100.2 ping statistics ---
6 packets transmitted, 6 packets received, 0% packet loss
round-trip min/avg/max/stddev = 135.477/177.495/300.588/56.384 ms